Now i am the first to admit that i am not good at processing-OK but definantly not good, This i proved to myself yesterday whilst going through the last of my images for my new website-Red Fox, Now foxes are my favorite animal, I dont know why but i love to photograph them and i have more fox images that any other mammal, Last year was a bumper year for me spending 3 months watching very small cubs growing up, Most of the photography was done in low light with a Canon 1D MK3, I dont know why but the images were quite flat as RAW files and although the foxes in Switzerland seem lighter than other places where i have seen them i could never really get a result after processing that did the fox any justice, As i mentioned in a previous post i have recently purchased a book on
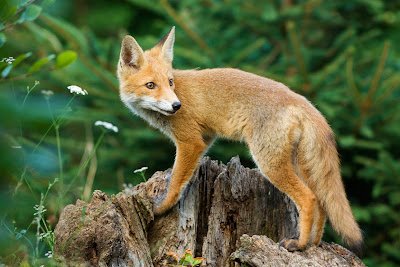
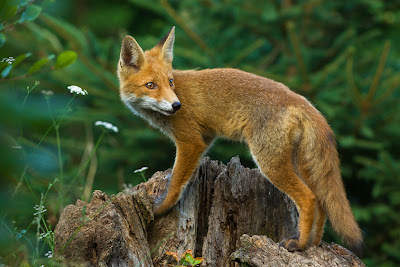
CS4 for nature Photographers and going through that and the attached DVD i thought that i would give the new Adjustment brush a go-WOW is all i can say,Layers made easy, Layer masks are something i never really got to grips with and Martin did show me a couple of times, Basically its where you isolate a part of the image and do localised adjustments to it without affecting the rest of the image, The new Adjustment brush does this without the need for making the image black and painting it back in, So first off open a RAW image and do any normal adjustments i.e exposure,colour temp etc then with the fox image i hit the adjustment brush and 'painted' over the fox, I ticked the auto mask feature to keep the brush strokes within the bounderies of the fox outline,if you do go over there is an erase button that you then can go back and paint out the area you dont want doing, once i had painted the fox (i set the exposure for -0.5 as i wanted to darken it) i ticked the show mask which then made the fox white and shows any areas where i had missed which i quickly painted in,Once i had done this i ticked the erase button and painted the eyes back in as i did not want to darken them, i moved the exposure to a setting that looked right which ended up around -0.4 and then added some saturation-remember this will only affect the part of the image that is 'painted' once i was happy i then repeated the process just taking in the eyes and i lightened then a little by adjusting the exposure to +0.25 and a little saturation, If shooting a landscape you could do this on a mutiple areas,If you tick the show pins box every time you add a new ask a pin will appear on the area that you have done so if you have made 5 masks on different parts of the image you can click on a pin and it will take you back to the settings applied for that part and if needed you can readjust them-all very easy to use and well shown in the DVD with the book, Once you are happy with what you have done just 'open' the image into CS4 and apply any extra processing needed i.e curves ,sharpening etc,Look at the 2 images below,The top one is from last year after my usual processing and the bottom one is from yesterday after using the adjustment brush
Its a tool that will now become part of my workflow, I know that Lightroom has the same feature and is the cheaper option if you are looking for software with it
Dave


The images looked flat last year... let me guess.. not liked they looked on the rear LCD screen on the camera?
ReplyDeleteIt's Picture Styles and one of the reasons to use DPP. When you view an image on the rear LCd it has whatever Picture Style you have set on the camera - most people leave this to 'Standard" that means slightly increased saturation and contrast. Since every RAW file has a Picture Style attached, when you put the file into anything that doesn't support Picture Styles that in-camera view processing is ignored and images look much flatter and duller than you remember them.
I'm told LR 2 supports Picture Styles in some way so that may be the solution if you don't like DPP (or in your case aren't shooting with Canon anymore!) but for anyone still using Canon and finding the same thing, it's something to keep in mind.
Blab
In fact, I blogged about this a while back.....
ReplyDeletehttp://blabpictures.blogspot.com/2008/11/why-dpp.html
No need to guess as i dont remember what the images looked like on the LCD as i only tend to look at the histogram.As Lightroom 2 and CS4 use the same ACR engine would they not be the same? Canons seem to have a flatter look to their RAW files particuarly when the light drops,The MK3 wasnt as bad as the MK2,It may have something to do with the filter on the sensor that helps keep noise and moire at bay, I believe that the Nikon range uses a thinner filter, Either way the images can be bought back in processing, Its just that the Canons need a tad more-not a problem once you have sussed it
ReplyDelete