Have you ever sat down and looked at the amount of different processing software programmes there are out there these days, Not only do you have the camera manufacturers own like Nikons NX2 and Canons DPP but also Adobes photoshop and lightroom and even Apple has Aperture, infact there is software for every type of work and every budget even free like Bibble, It all starts to get expensive if you want more than one or two programmes
I have been looking at the software that i use and they are
1.Adobe Photoshop CS5 (RAW Converter)
2.Capture One Pro (RAW Converter)
3.Breezebrowser Pro (Image Browser)
4.Photomatix (HDR)
5.PTgui (Photo Stitching)
6.Helicon Focus (Photo Stacking)
7.Nik Ultimate Edition (Noise reduction, sharpening, selective colour,HDR and B+W)
8.Portrait Professional (portraits)
Not everybody knows of the Nik software products and i have people getting confused thinking it has something to do with Nikon, But for the last few years it has gained a great reputation and i have friends that use it with great effect, My order for it will be placed this week
Luckily you can normally get a months free trial on most software so you can try before you buy but the above is what i currently use and recommend
Dave
Showing posts with label Software. Show all posts
Showing posts with label Software. Show all posts
Friday, 16 September 2011

Friday, 30 July 2010
Keep your software up to date
One of the great delights with both Adobe Photoshop CS5 and Phase One Capture One is the auto updates feature. I think I have had two come through for CS5 since I originally installed it not so long ago and a few more with Capture One since the beginning of the year.
It was while mulling over what to write last night that it struck me that I don't get this for a couple of other bits of software that I use.
Dave and I have been strong protagonists of Breezebrowser Pro, but it doesn't always tell me when it has been updated, so I have to remember to check.
If you are a user of this fine software, you will find that it is now up to Version 1.9.5.4 issued on 5th July - which has just finished downloading as I write this
I sometimes use Canon's own DPP - this is now at version 3.8.1 - again I was a version down level so have changed that.
I am still currently on Lightroom v2 which as at 2.7, and as far as that will go as it has now been replaced by V3, which I will get round to getting upgrading soon.
There are links to the full and upgrade versions on the Amazon bar on the right if you are interested.
Well I am sure you are all far more disciplined than me, and have all your software at current levels, but if not then this might have been of use to you tonight.
Note, the above versions are all for the higher end PC platform. Apple users can also check their links too - except of course for Breezebrowser Pro
Martin
Friday, 4 September 2009
Photomatix HDR software
HDR or high dynamic range has been popular for sometime, Its where you take an image at a variety of different shutter speeds and blend them together to make an image that would be impossible in camera due to the huge difference in the tonal range, A scene where the sky is bright but the foreground is dark for instance, When i was in Colorado in June i took some scenic shots with HDR in mind but have only recently purchased the software to do it, I have tried HDR in Photoshop but the images never really came out the way i had hoped, Photomatix name comes up time and time again and seems to be 'the' HDR software so that's what i purchased, The software is very easy to use
1.Take the images that you want to process under generate HDR, In the image below i shot 5 images with the camera bracketing shots at -2,-1,0,+1 and +2 so i had a well exposed image and then under and over exposed images giving me a good range of tones
2.Once you have clicked ok you get a menu where you can tick boxes for aligning image,reduce CA,reduce noise and ghosting and change white balance etc if needed
3,Once you click OK it will blend all the images together and come up with an image which looks truly awful-full of blocked shadows and blown highlights, but if you place the cursor over the image it will show you what the image will look like in the small window
4,Click on the Tone Mapping button
5, Now the image has been transformed,There are 2 tabs at the top 1 says Details Enhancer and the other Tone compressor, The detail enhancer gives a Paintery effect and the Tone compressor is more like a photograph, For the landscapes i took i quite liked the paintery effect as long as you don't over do it
6,The screen on the left gives a list of things to play around with so you can customise the image as you like, Once you have moved a slider you can either click on the 'show original' tab above the image to see what the image was like or just click on the go back button at the bottom to go to the previous setting,
7, Keep an eye on the histogram top left when making adjustments
8,You can click on the image and a loup screen comes up so you can take a closer look
9, Once you are happy press the Process button the image is ready to be saved
10, Open up in photoshop and finish levels,sat etc
The software is very intuitive and not expensive at $99
Its still early days for me using this but the results so far are OK
Here are 3 images
The first is normal processing in PS-No HRD
The second is HDR using Detail Enhancer (paintery effect)
The third is HDR using Tone Compressor
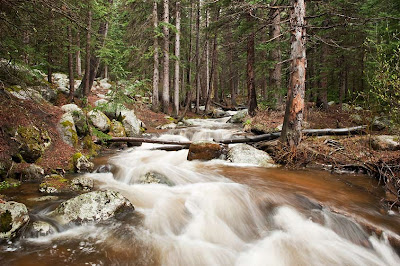
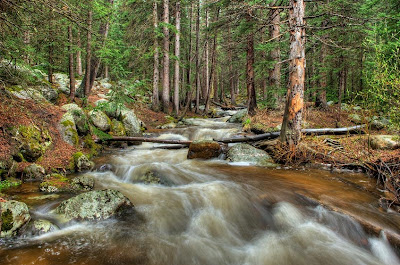
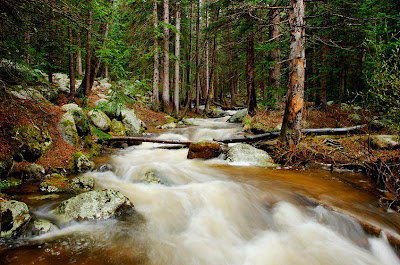
3 very different looking images from the same RAW files,HDR images can look very over done if you are not careful but like all processing if you are subtle with the changes it can really enhance your images
And here is an example of where HDR software comes into its own, Again in Colorado, I shot this scene but to stop the snowy mountain tops blowing out i had to under expose the foreground and the tree area was dark, If i had used the traditional ND Grad filter to even the sky and foreground out i would have ended up with the tops of the near mountains and the top of the trees darker than the rest which would have looked unnatural, By blending the images in Photomatix HDR software i now have detail in the sky/mountains and the tree/foreground area
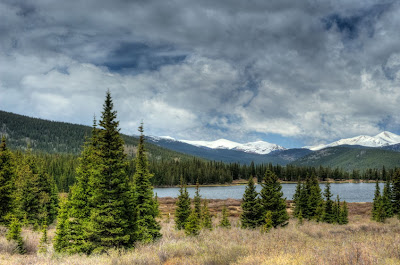
Dave
1.Take the images that you want to process under generate HDR, In the image below i shot 5 images with the camera bracketing shots at -2,-1,0,+1 and +2 so i had a well exposed image and then under and over exposed images giving me a good range of tones
2.Once you have clicked ok you get a menu where you can tick boxes for aligning image,reduce CA,reduce noise and ghosting and change white balance etc if needed
3,Once you click OK it will blend all the images together and come up with an image which looks truly awful-full of blocked shadows and blown highlights, but if you place the cursor over the image it will show you what the image will look like in the small window
4,Click on the Tone Mapping button
5, Now the image has been transformed,There are 2 tabs at the top 1 says Details Enhancer and the other Tone compressor, The detail enhancer gives a Paintery effect and the Tone compressor is more like a photograph, For the landscapes i took i quite liked the paintery effect as long as you don't over do it
6,The screen on the left gives a list of things to play around with so you can customise the image as you like, Once you have moved a slider you can either click on the 'show original' tab above the image to see what the image was like or just click on the go back button at the bottom to go to the previous setting,
7, Keep an eye on the histogram top left when making adjustments
8,You can click on the image and a loup screen comes up so you can take a closer look
9, Once you are happy press the Process button the image is ready to be saved
10, Open up in photoshop and finish levels,sat etc
The software is very intuitive and not expensive at $99
Its still early days for me using this but the results so far are OK
Here are 3 images
The first is normal processing in PS-No HRD
The second is HDR using Detail Enhancer (paintery effect)
The third is HDR using Tone Compressor


3 very different looking images from the same RAW files,HDR images can look very over done if you are not careful but like all processing if you are subtle with the changes it can really enhance your images
And here is an example of where HDR software comes into its own, Again in Colorado, I shot this scene but to stop the snowy mountain tops blowing out i had to under expose the foreground and the tree area was dark, If i had used the traditional ND Grad filter to even the sky and foreground out i would have ended up with the tops of the near mountains and the top of the trees darker than the rest which would have looked unnatural, By blending the images in Photomatix HDR software i now have detail in the sky/mountains and the tree/foreground area

Dave
Tuesday, 10 February 2009
Software-CS4/Lightroom Adjustment Tool
Now i am the first to admit that i am not good at processing-OK but definantly not good, This i proved to myself yesterday whilst going through the last of my images for my new website-Red Fox, Now foxes are my favorite animal, I dont know why but i love to photograph them and i have more fox images that any other mammal, Last year was a bumper year for me spending 3 months watching very small cubs growing up, Most of the photography was done in low light with a Canon 1D MK3, I dont know why but the images were quite flat as RAW files and although the foxes in Switzerland seem lighter than other places where i have seen them i could never really get a result after processing that did the fox any justice, As i mentioned in a previous post i have recently purchased a book on CS4 for nature Photographers and going through that and the attached DVD i thought that i would give the new Adjustment brush a go-WOW is all i can say,Layers made easy, Layer masks are something i never really got to grips with and Martin did show me a couple of times, Basically its where you isolate a part of the image and do localised adjustments to it without affecting the rest of the image, The new Adjustment brush does this without the need for making the image black and painting it back in, So first off open a RAW image and do any normal adjustments i.e exposure,colour temp etc then with the fox image i hit the adjustment brush and 'painted' over the fox, I ticked the auto mask feature to keep the brush strokes within the bounderies of the fox outline,if you do go over there is an erase button that you then can go back and paint out the area you dont want doing, once i had painted the fox (i set the exposure for -0.5 as i wanted to darken it) i ticked the show mask which then made the fox white and shows any areas where i had missed which i quickly painted in,Once i had done this i ticked the erase button and painted the eyes back in as i did not want to darken them, i moved the exposure to a setting that looked right which ended up around -0.4 and then added some saturation-remember this will only affect the part of the image that is 'painted' once i was happy i then repeated the process just taking in the eyes and i lightened then a little by adjusting the exposure to +0.25 and a little saturation, If shooting a landscape you could do this on a mutiple areas,If you tick the show pins box every time you add a new ask a pin will appear on the area that you have done so if you have made 5 masks on different parts of the image you can click on a pin and it will take you back to the settings applied for that part and if needed you can readjust them-all very easy to use and well shown in the DVD with the book, Once you are happy with what you have done just 'open' the image into CS4 and apply any extra processing needed i.e curves ,sharpening etc,Look at the 2 images below,The top one is from last year after my usual processing and the bottom one is from yesterday after using the adjustment brush
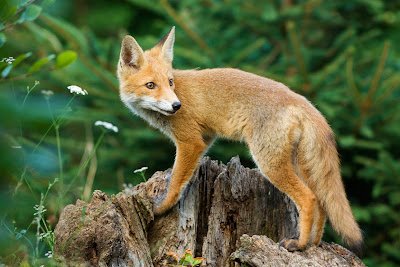
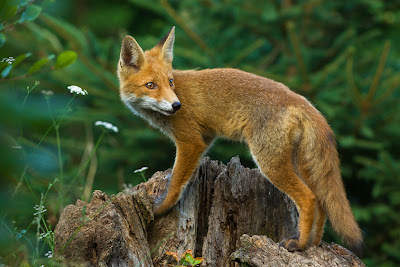
Its a tool that will now become part of my workflow, I know that Lightroom has the same feature and is the cheaper option if you are looking for software with it
Dave


Its a tool that will now become part of my workflow, I know that Lightroom has the same feature and is the cheaper option if you are looking for software with it
Dave
Wednesday, 4 February 2009
Software-Breezebrowser PRO
Sometimes something comes along that makes your life a lot easier for very little money-it doesn't happen very often but when it does take advantage. Many years ago when I changed over from film to Digital, I heard of a software called Breezebrowser, I checked it out and bought it. Wow is all I can say-fast is another word. If you get fed up waiting for your RAW files to download then get breezebrowser. A 4 gig card downloads in less than a minute right before your eyes. Its quite an old programme that has never been beaten as far as I am concerned. You can use it to process your RAW files, I don't, I use it for browsing and deleting my days shoot, then quickly batch rename-takes a second and then copy them into a file for processing in photoshop, breezebrowser used to have a couple of problems. It was Canon orientated and for PC use only. Well the first has changed and i can use it with my Nikon gear but its still PC only which is a shame as friends of mine who have macs and have seen me use Breezebrowser would love to have it.
So you open breezebrowser and click on the cardreader to open the file and in seconds they are in front of you
 I then highlight about 6-10 images and press Crtl S and i get a slideshow of those images, I make a note which ones don't make the grade and press Esc to bring me back to the main page and then delete those I made note of,Of course you can go through each image individually.
If you bring an image up on its own and press Esc you can see the focus point as shown here along with equipment used-body, lens etc, Shooting data and Histogram.

Now if you have a sequence of images which is very possible but you need to just keep the very sharpest you can check up to 4 images together by selecting 4 images and pressing Ctrl Z then with the scroll wheel on your mouse you can zoom into say the eye and see which is the sharpest of the bunch like here.

All extremely quick and easy to use, batch numbering takes seconds and over all its the easiest system have come across. Most people that i have shown have gone straight out and purchased it. Also check out some of Breeze systems latest offerings allowing you to control your camera functions via a pc for remote shooting-looks cool and something I may invest in. I can't recommend Breezebrowser PRO enough, if you want to use BB for all your workflow then Arthur Morris does a paper on it which you can buy from his site.
Dave
Subscribe to:
Posts (Atom)