I see quite heavily manipulated images more and more these days, I have nothing against them as long as the photographer tells us what he has done to the image, Its the photographers image after all so he should feel free to do what he wants with it, I notice manipulated images much more on American forums and one or 2 pros out here heavily advertise how to remove or add parts of the image, Now these things are worth knowing how to do but by putting images up on forums that have been heavily modified without saying what's been done throws out the wrong kind of signals to me,People especially the younger members look at forums and see wonderful images and think 'i wish i take shots like that' when i truth they do-take a shot with 20 birds in and simply remove the 'distracting' 18 of them, This again brings me to the American photographer recently named and shamed for 'cheating' in a competition, In the days of film/slide what you took was the final image, if you clipped a wing or a deer had its head poking in the side of the image that was that, These days if you clip a wing you just add the end on and clone the deer's head out-No problem for me as long as its said so that nobody is under any illusion, Lets take a recent image that i looked at on birdphotographer.net -http://www.birdphotographers.net/forums/showthread.php?t=53831 now this is a nice image of 2 birds fighting, I thought that it was cropped as soon as i looked at it as the background was rather grainy and as we go down the photographer tells us the story of how the image was captured, Americans tend to like tight big in the frame images but on this occasion it was seen as too tight, The tog said that he had extra room if needed and as you go down you see some other images from the session, Now towards the bottom he puts another image up and then the original which shows that 2 other cranes have been removed from the scene which he then after adds one back to give a final image, I must admit that i was abit shocked at seeing 2 large birds removed from the scene, This to me doesn't seem right-at least that's my own personal view, Its taking away too much from what actually happened at the time of capture, To me this now stops being a photograph and becomes a manipulated image-fine for selling i guess but i see it more and more and seems to becoming the norm over here at least to grab a shot, crop the hell out of it and remove any 'debris' that distracts, Now i am not having a go at anybody-just the situation, I believe that the photographer who was named and shamed by the competition for cheating had done similar work to some images, If you are into heavily modified images then don't enter them into wildlife competitions as they ask for the originals at the final viewing and you will be found out, As i have said many times before i am old school in my photography and try to take and show what i have seen at the time, I may and do remove the odd twig or leaf but that's as far as i tend to go, I would be interested to hear your views on this type of after shot processing
I am off to New Jersey for a week from Saturday and will not have internet access where i am staying, If i find internet access somewhere i will post but apart from that Martin will keep blogging until my return
Dave
Showing posts with label PhotoshopCS4. Show all posts
Showing posts with label PhotoshopCS4. Show all posts
Saturday, 9 January 2010

Tuesday, 4 August 2009
Adobe Photoshop CS4 Companion
Just about a year ago, I found this great download from the website of Mark Johnson. Specifically covering Photoshop CS3 - I bought this and have made great use of it.
Well I see he has now added the companion for CS4 which can be found here. I have posted the link for the download version, but there is also a CD version available if you prefer, although it will cost you a little more.
They are big files, so be warned.
If you are users of either version, I would really recommend purchase and download - it really is excellent, and will give you all you need to know in one easy volume.
It is great to read off the Netbook while carrying out the work on the main desktop.
Martin
Well I see he has now added the companion for CS4 which can be found here. I have posted the link for the download version, but there is also a CD version available if you prefer, although it will cost you a little more.
They are big files, so be warned.
If you are users of either version, I would really recommend purchase and download - it really is excellent, and will give you all you need to know in one easy volume.
It is great to read off the Netbook while carrying out the work on the main desktop.
Martin
Saturday, 25 April 2009
Photoshop Zoom Burst

In the good ol days of film i would sometimes set your camera to get a long shutter speed-1 sec or more and then when hitting the shutter button smoothly zoom and you would get a 'zoom' effect on the image, I played with this a few time on plants and landscapes etc, The other day i shot for the first time a baseball game, The images came out great-very sharp but some of the backgrounds were a tad busy so i thought i would have a play and came across the zoom burst effect on Photoshop, I know its not a wildlife image but this effect can be used say on a lions head to draw the eye into it and give it a dynamic effect, I am not really one for manipulating images but to have a play around every now and again is a good thing, For the baseball image here i firstly went to filter>blur>radial blur.Then set to best quality,Zoom and i dragged the slider up to 100%.Hit the OK key and the whole image had the zoom effect, I then 'painted'the player back in with the history brush and carried on normally doing the levels,curves,sat etc, Its not an every day effect but it cleaned up the background and made the player really 'pop' out in the image
Dave
Thursday, 19 March 2009
Tips and Techniques - Sharpening
Well having read lots of questions about sharpening, and seen lots of problems with digital sharpening on prints, web images and digitally projected images I thought it was about time I did a 'Techniques and Tips' tutorial.
Before I start I need to issue a health check - there are many many ways to sharpen digital images - I know I have used many different ways to get to where I am now.
This is my way - it works for me. If your way works - great, stick with it but if it doesn't then here is an option for you to consider.
Before we start, lets just consider workflow.
I review my image with Breezebrowser Pro, check out link for Dave's review last month, using the view in HQ mode to see if the image is a keeper or bin fodder.
Once I have decided what I want to keep I convert the .cr2 file to a 16bit TIF - always. Not jpeg, not 8 bit.
I then post process, currently using Adobe Photoshop CS3. The image is generally still at original size unless I am doing a quick and dirty for a web post or something.
So global changes in the RAW processing, local changes using adjustment layer masks for levels, curves, sat, and selective colour.
Then I save the file as my master.
Now the next choice is what form of output do I go for. Once I have decided I will then crop or resize the image. I may, albeit rarely, run a bit of localised noise reduction using a layer mask in a separate layer and then only attack the noise areas, certainly not the main subject such as a bird, to avoid loss of detail.
Now I think about sharpening.
So I will show some quick screen grabs to illustrate.
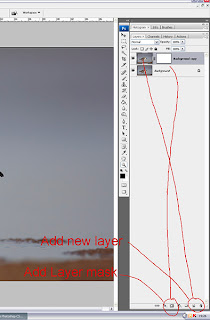 Take your master, save as a separate file and flatten any layers that you have to help make the file size more manageable.
In the layers pallette, drag and drop the background layer onto the 'Create a new layer' icon at the bottom left. This will give you a duplicate layer. On that bottom row of icons, you will also see a 'Add Layer mask'.
Click that and you will see a small white rectangle next to the duplicate layer.
Click back on the duplicate layer thumbnail, next to the new layer mask. This will ensure that the sharpening changes you make are being applied to the image and not the mask.
Then select Filter >Sharpen > Unsharp mask.
Set the zoom at 100% if you are sharpening for web/digital projection and 50% if printing. For the former, I would use about 50%, 0.3 and 0. I then do this a few times until it is just oversharpened in the window. Then click OK.
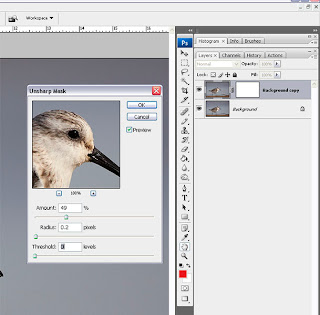 Now on the full screen image at actual pixels, so Zoom, then actual pixels to get that, I then modulate the opacity of the layer using the percentage slider to fine tune the sharpening to exactly where I want it. If there are slight halos, I look to slide back until they have gone.
However, if they don't totally go, then don't fret - more later.
The next thing is I then click on the layer mask we added a bit ago, then select the paint bucket tool and fill the layer mask with black paint and all the sharpening disappears. Huh? I hear you say.
Stay with me.
Before I start I need to issue a health check - there are many many ways to sharpen digital images - I know I have used many different ways to get to where I am now.
This is my way - it works for me. If your way works - great, stick with it but if it doesn't then here is an option for you to consider.
Before we start, lets just consider workflow.
I review my image with Breezebrowser Pro, check out link for Dave's review last month, using the view in HQ mode to see if the image is a keeper or bin fodder.
Once I have decided what I want to keep I convert the .cr2 file to a 16bit TIF - always. Not jpeg, not 8 bit.
I then post process, currently using Adobe Photoshop CS3. The image is generally still at original size unless I am doing a quick and dirty for a web post or something.
So global changes in the RAW processing, local changes using adjustment layer masks for levels, curves, sat, and selective colour.
Then I save the file as my master.
Now the next choice is what form of output do I go for. Once I have decided I will then crop or resize the image. I may, albeit rarely, run a bit of localised noise reduction using a layer mask in a separate layer and then only attack the noise areas, certainly not the main subject such as a bird, to avoid loss of detail.
Now I think about sharpening.
So I will show some quick screen grabs to illustrate.
 Take your master, save as a separate file and flatten any layers that you have to help make the file size more manageable.
In the layers pallette, drag and drop the background layer onto the 'Create a new layer' icon at the bottom left. This will give you a duplicate layer. On that bottom row of icons, you will also see a 'Add Layer mask'.
Click that and you will see a small white rectangle next to the duplicate layer.
Click back on the duplicate layer thumbnail, next to the new layer mask. This will ensure that the sharpening changes you make are being applied to the image and not the mask.
Then select Filter >Sharpen > Unsharp mask.
Set the zoom at 100% if you are sharpening for web/digital projection and 50% if printing. For the former, I would use about 50%, 0.3 and 0. I then do this a few times until it is just oversharpened in the window. Then click OK.
 Now on the full screen image at actual pixels, so Zoom, then actual pixels to get that, I then modulate the opacity of the layer using the percentage slider to fine tune the sharpening to exactly where I want it. If there are slight halos, I look to slide back until they have gone.
However, if they don't totally go, then don't fret - more later.
The next thing is I then click on the layer mask we added a bit ago, then select the paint bucket tool and fill the layer mask with black paint and all the sharpening disappears. Huh? I hear you say.
Stay with me.
Then click the \ key, select the paint brush tool, set the colour to white and start painting those areas of the subject you want sharp, and only those areas. The area you are painting will show as red so you can see where you have been. Just toggle the \ key on and off as you require to see the effects.
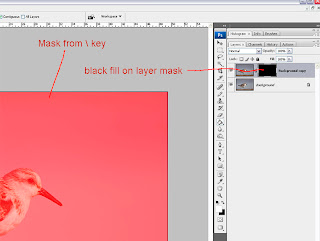 Complete the image and check. Use the opacity slider just to re verify you are happy with the level of sharpening.
 Complete the image and check. Use the opacity slider just to re verify you are happy with the level of sharpening.
If you have any halos, you can actually paint then out again, by selecting the brush, colour black, set the brush to a small and hard setting and paint the halos into history.
Make sure you paint sharpening onto any areas of the scene that you think needs to be sharp.
Now I have shown a Sanderling here. I only want the bird and the sand that is in the line of the DOF in focus. If I sharpen the background, I might induce noise or sharpening artefact's, so this method will allow me to keep that creamy smooth. Particularly important when I am making A3 + prints.
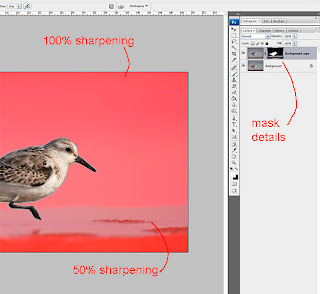 Also remember you can vary the levels of sharpening that you give an image across it by varying the levels of masking. If you have set the sharpening for one area at the optimum level, but you want a some but not as much in another area, then set the opacity of the brush tool to 50% or whatever is appropriate for your image and paint the sharpening out.
Make sure you paint sharpening onto any areas of the scene that you think needs to be sharp.
Now I have shown a Sanderling here. I only want the bird and the sand that is in the line of the DOF in focus. If I sharpen the background, I might induce noise or sharpening artefact's, so this method will allow me to keep that creamy smooth. Particularly important when I am making A3 + prints.
 Also remember you can vary the levels of sharpening that you give an image across it by varying the levels of masking. If you have set the sharpening for one area at the optimum level, but you want a some but not as much in another area, then set the opacity of the brush tool to 50% or whatever is appropriate for your image and paint the sharpening out.
This might sound complicated, but once you have done it once or twice, it comes very quickly.
Now as I say, this works for me and if you have your own pet method, then do stay with it. But I have found I can avoid inducing or increasing noise, I can control the halos, only that part of an image that I want is sharpened.
if you try this, lets us know how you get on.
Now as I say, this works for me and if you have your own pet method, then do stay with it. But I have found I can avoid inducing or increasing noise, I can control the halos, only that part of an image that I want is sharpened.
if you try this, lets us know how you get on.
Scott Kelby shows a number of different ways to sharpen in his books that you might also like to look at.
Update: Replaced the last two images as the original ones showed you how to nicely sharpen the background and not the subject - apologies for the confusion
Martin
Update: Replaced the last two images as the original ones showed you how to nicely sharpen the background and not the subject - apologies for the confusion
Martin
Thursday, 26 February 2009
News - Adobe Photoshop CS4 Update
Adobe have announced an upgrade for CS4. It covers some major bugs like the clone/healing brushes being very slow. I downloaded it today and now works perfectly-Thank you Adobe-Full details are on Rob Galbraiths site.
Tuesday, 10 February 2009
Software-CS4/Lightroom Adjustment Tool
Now i am the first to admit that i am not good at processing-OK but definantly not good, This i proved to myself yesterday whilst going through the last of my images for my new website-Red Fox, Now foxes are my favorite animal, I dont know why but i love to photograph them and i have more fox images that any other mammal, Last year was a bumper year for me spending 3 months watching very small cubs growing up, Most of the photography was done in low light with a Canon 1D MK3, I dont know why but the images were quite flat as RAW files and although the foxes in Switzerland seem lighter than other places where i have seen them i could never really get a result after processing that did the fox any justice, As i mentioned in a previous post i have recently purchased a book on CS4 for nature Photographers and going through that and the attached DVD i thought that i would give the new Adjustment brush a go-WOW is all i can say,Layers made easy, Layer masks are something i never really got to grips with and Martin did show me a couple of times, Basically its where you isolate a part of the image and do localised adjustments to it without affecting the rest of the image, The new Adjustment brush does this without the need for making the image black and painting it back in, So first off open a RAW image and do any normal adjustments i.e exposure,colour temp etc then with the fox image i hit the adjustment brush and 'painted' over the fox, I ticked the auto mask feature to keep the brush strokes within the bounderies of the fox outline,if you do go over there is an erase button that you then can go back and paint out the area you dont want doing, once i had painted the fox (i set the exposure for -0.5 as i wanted to darken it) i ticked the show mask which then made the fox white and shows any areas where i had missed which i quickly painted in,Once i had done this i ticked the erase button and painted the eyes back in as i did not want to darken them, i moved the exposure to a setting that looked right which ended up around -0.4 and then added some saturation-remember this will only affect the part of the image that is 'painted' once i was happy i then repeated the process just taking in the eyes and i lightened then a little by adjusting the exposure to +0.25 and a little saturation, If shooting a landscape you could do this on a mutiple areas,If you tick the show pins box every time you add a new ask a pin will appear on the area that you have done so if you have made 5 masks on different parts of the image you can click on a pin and it will take you back to the settings applied for that part and if needed you can readjust them-all very easy to use and well shown in the DVD with the book, Once you are happy with what you have done just 'open' the image into CS4 and apply any extra processing needed i.e curves ,sharpening etc,Look at the 2 images below,The top one is from last year after my usual processing and the bottom one is from yesterday after using the adjustment brush
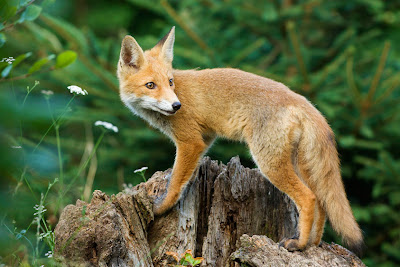
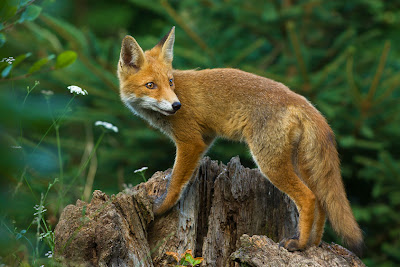
Its a tool that will now become part of my workflow, I know that Lightroom has the same feature and is the cheaper option if you are looking for software with it
Dave


Its a tool that will now become part of my workflow, I know that Lightroom has the same feature and is the cheaper option if you are looking for software with it
Dave
Thursday, 29 January 2009
Reviews - A good read for Photoshop CS4 users
If you buy the latest greatest Camera bodies you are normally forced to up grade various components to go with it. Like software and even your PC to work with the new programmes. This is something I had to do when I bought the Canon 1D3,To open the RAW files in Photoshop I had to buy the new CS3 as I prefer Photoshop to Canons DPP software, I could have opened the RAW files in DPP then converted to Tiff and then opened in CS2 but I like to work on a RAW not a Tiff so I purchased Photoshop CS3 and then found that my PC was too old for the new software so ended up with a new Dell-A lot of extra money on top of the Camera body, Now moving over to Nikons new bodies i purchased in advance from Adobe the new Photoshop CS4 and Lightroom programmes, CS4 is not that different to CS3 but it does have one or 2 nice new features tucked away in the ACR engine,The adjustment brush for one, Now I am the first to admit i am not really into processing and keep it to a bare minimum,I always try to get it right in camera so basically my workflow involves adjusting levels,Curves,Saturation and sharpening along with cropping and levelling if needed,So i have £500 software and use 2% of it, So i decided that now is the time to learn how to use the product more just in case I need to, After looking around the shops and forums one book kept coming up and that suit my needs-Photoshop CS4 for Nature Photographers-'A workshop in a book' By Ellen and Josh Anon, I purchased it from Amazon and for the last week or so have been going through it,The thing that I like is that it comes with a DVD that lasts about an hour and shows you how to set up 'Bridge' and runs through the new features found on CS4 over CS3,By watching the DVD you can clearly see how to do things and its done it a very simple manner-perfect for me as I hate it when people who know what they are doing write stuff like everybody would know how to do it,The book has lots of images of before and after and what the screen should look like as you are doing things-very layman's terms. It's priced here in the states at $39.99 but on Amazon its much cheaper-A good read and perfect for the Nature Photographer who is trying to get his/her head around Photoshop CS4-Now just need to get one for Lightroom 2
Dave
Subscribe to:
Posts (Atom)