Although Dave and I are primarily wildlife photographers, we both do a bit of landscape photography too. There is a natural fit really with the places that we go and see.
Now the best landscape photography is all about light and how we use it to the best of our ability. The same scene can have many different looks as a result of the different light from the different times of the day and at different times of the year with the sun is at a different height.
One of the tools that we can use to help us control that light is the Neutral density graduated filter, or ND grad as they are known for short.
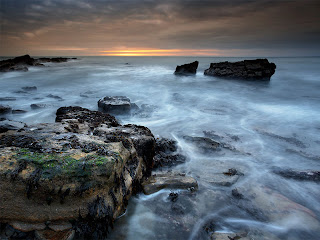
The image above used a 2 stop hard edged ND grad to hold back the brighter sky and allow me to get detail in the much darker foreground.
Both Dave and I use the Lee Filters system. It is quite expensive as filter systems go, but as the old mantra goes 'You get what you pay for'.
Today I will cover just the resin filters that I use. Later blogposts will cover how we attach to the camera and also the use of polarising filters.
Lee sell ND grads in sets of three ranging from 1 stop to 3 stops, which they sell 0.3, 0.6 and 0.9. The number of stops indicate the amount of light that they 'hold back'.
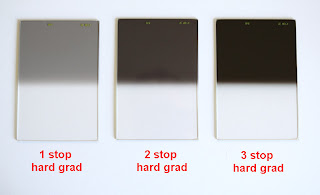
This image shows the full set of the hard edge grads. the term hard edge refers to the transition from the filter through to the clear. Hard meaning the transition is short and soft where it is more gradual as you will see below.

On this image you can see the difference in the transition between hard and soft.
I would tend to use the hard edge when I shooting seascapes like the image above and then use the soft edge when I might have some parts of the image in the filtered part where I want less filtration. You have to be very careful, particularly with mountain landscapes that you don't end up with heavily darkened parts of the scene as well as the sky.
This is one area where I use a special filter that I had made to order which is the blending filter (last filter on the right in the image).
This filter goes from 3 stops at the top and blends evenly to zero at the bottom with no harsh edge stops. This is one of my favourite and most often used filters to give methat gradual transition and avoid the obvious steps.
One useful tip I learned was to use the DOF preview button to better see the effects of the filter. More modern cameras have live view and with a combination of that, the histogram displayed and the DOF button depressed, you really can see every bit of information you need and mistakes or wasted shots really shouldn't occur - but we will still make those mistakes - I know I do.
So look out for future posts on the rest of the system and polarisers
Martin
Now the best landscape photography is all about light and how we use it to the best of our ability. The same scene can have many different looks as a result of the different light from the different times of the day and at different times of the year with the sun is at a different height.

One of the tools that we can use to help us control that light is the Neutral density graduated filter, or ND grad as they are known for short.
The image above used a 2 stop hard edged ND grad to hold back the brighter sky and allow me to get detail in the much darker foreground.
Both Dave and I use the Lee Filters system. It is quite expensive as filter systems go, but as the old mantra goes 'You get what you pay for'.
Today I will cover just the resin filters that I use. Later blogposts will cover how we attach to the camera and also the use of polarising filters.
Lee sell ND grads in sets of three ranging from 1 stop to 3 stops, which they sell 0.3, 0.6 and 0.9. The number of stops indicate the amount of light that they 'hold back'.

This image shows the full set of the hard edge grads. the term hard edge refers to the transition from the filter through to the clear. Hard meaning the transition is short and soft where it is more gradual as you will see below.

On this image you can see the difference in the transition between hard and soft.
I would tend to use the hard edge when I shooting seascapes like the image above and then use the soft edge when I might have some parts of the image in the filtered part where I want less filtration. You have to be very careful, particularly with mountain landscapes that you don't end up with heavily darkened parts of the scene as well as the sky.
This is one area where I use a special filter that I had made to order which is the blending filter (last filter on the right in the image).
This filter goes from 3 stops at the top and blends evenly to zero at the bottom with no harsh edge stops. This is one of my favourite and most often used filters to give methat gradual transition and avoid the obvious steps.
One useful tip I learned was to use the DOF preview button to better see the effects of the filter. More modern cameras have live view and with a combination of that, the histogram displayed and the DOF button depressed, you really can see every bit of information you need and mistakes or wasted shots really shouldn't occur - but we will still make those mistakes - I know I do.
So look out for future posts on the rest of the system and polarisers
Martin
As ever Martin thanks for that. Mark
ReplyDeleteInterested in reading about the Blending filter - not heard about that before - can I ask where you had it made?
ReplyDeleteHi Jamie,
ReplyDeleteI have generally bought my Lee filters from a UK based company called Morco. I rang and spoke to them. It is a special order from Lee - it took about 6 weeks and was about £40 IRC
Martin