The dpreview review (yes that is right) on the 1Dmkiv made comparisons with the 7D as part of the review. It fairs very well, particularly if you consider you can get three! of them with grips for the same price as just one 1Dmkiv.
Dave also sent me this link comparing the 7D with the 1Dmk111 with specific considerations for bird photographers.
Now if you have been following my reviews on the 7D here, here, here and here you will have seen that I am coming to the conclusion that this is a good piece of kit for 'wildlifers' on many counts. I have still yet to do another part to my review which will cover off noise and high ISO, and how to process for best effect.
As you will have seen in this post where I got some images of Crossbills, and also yet to be posted images of Sparrowhawk in my garden, the 7D is increasingly the body of choice, with the 1Dmk111 being relegated to that of back up.
So when I see forum posts that say 'Would the 7D be a good back up to my 1Dmk whatever?'. I would say no - more likely your 1D will be a good back up to your 7D. Of course, I will caveat that specifically for bird photography at distance, which is where I have been testing it.
But the key is you need to test for your genre of photography, and not just believe others, in particular Canon's marketing spin.
Martin
Showing posts with label gear we use and abuse. Show all posts
Showing posts with label gear we use and abuse. Show all posts
Wednesday, 24 February 2010

Thursday, 30 April 2009
Gear we use and abuse - Binoculars
The single most important bit of kit I carry in my bag is my binoculars.
Not my camera or long lens? No.
If I cannot see my subjects to begin with then I have no hope of getting into a position to get images of them.
When I go out to photograph wildlife, I always tell my self that I am going to see the wildlife and if I can get a photo well that is a bonus. On days like these, that is sometimes hard to reconcile in your mind - but I try all the same. But the good thing about those times is that I was able to still enjoy watching because I had my binos.
Now these are very personal bits of kit and what some people like others really dislike.
But here are my thoughts based on many many years of bird and wildlife watching, even before the photo bug took hold.
Best size is generally 8 or 10 x. I have tried larger magnifications but it makes for blurry images due to movement, although you can get IS models, but the subject can be much harder to find. I once tried out the Canon 12 x image stabilised models and just found it so much more difficult to find the subjects, particularly the smaller birds in the trees.
I would also recommend getting at least 40 in the second number - the size of the object lens. The bigger the number, the brighter the image as more light is getting in. I have used the dinky 8 x 25 compacts but found them to be pretty poor for serious wildlife watching.
Now the final thing is how much to spend. Well it all depends on how serious you are, but essentially, as with camera lenses you generally get what you pay for. You can get reasonable working models from about £100 to 150 in the UK but as you spend more the image just keeps getting better.
If you don't believe me go to one of the Optics centre that are around some of the larger nature reserves. Pick up a £100 pair and then pick up the equivalent Zeiss, Svarokski or Leica, usually around the £1000 or more mark, and tell me you can't see a difference.
But you have to pick a pair that meets your price range.
I currently use a very fine pair from Opticron, 8 x 42 SRGA models. Conventional shaped binoculars, bright, sharp and pretty light. But that doesn't stop me lusting for the latest Leica HD models.
So never go out without them, as even if you don't get any photos, you will see so much more
Martin
Not my camera or long lens? No.
If I cannot see my subjects to begin with then I have no hope of getting into a position to get images of them.
When I go out to photograph wildlife, I always tell my self that I am going to see the wildlife and if I can get a photo well that is a bonus. On days like these, that is sometimes hard to reconcile in your mind - but I try all the same. But the good thing about those times is that I was able to still enjoy watching because I had my binos.
Now these are very personal bits of kit and what some people like others really dislike.
But here are my thoughts based on many many years of bird and wildlife watching, even before the photo bug took hold.
Best size is generally 8 or 10 x. I have tried larger magnifications but it makes for blurry images due to movement, although you can get IS models, but the subject can be much harder to find. I once tried out the Canon 12 x image stabilised models and just found it so much more difficult to find the subjects, particularly the smaller birds in the trees.
I would also recommend getting at least 40 in the second number - the size of the object lens. The bigger the number, the brighter the image as more light is getting in. I have used the dinky 8 x 25 compacts but found them to be pretty poor for serious wildlife watching.
Now the final thing is how much to spend. Well it all depends on how serious you are, but essentially, as with camera lenses you generally get what you pay for. You can get reasonable working models from about £100 to 150 in the UK but as you spend more the image just keeps getting better.
If you don't believe me go to one of the Optics centre that are around some of the larger nature reserves. Pick up a £100 pair and then pick up the equivalent Zeiss, Svarokski or Leica, usually around the £1000 or more mark, and tell me you can't see a difference.
But you have to pick a pair that meets your price range.
I currently use a very fine pair from Opticron, 8 x 42 SRGA models. Conventional shaped binoculars, bright, sharp and pretty light. But that doesn't stop me lusting for the latest Leica HD models.
So never go out without them, as even if you don't get any photos, you will see so much more
Martin
Monday, 27 April 2009
Gear we use and abuse-Think Tank Security

As air travel is getting harder and harder for the photographer and with a trip or two coming up i decided to push the boat out and buy a new bag for my kit, Not just any bag but a bag designed specifically for the travelling photographer, The Think Tank security is designed to fit the maximum amount of gear into the bag and still meet airline requirements for over head lockers, I somehow managed to get my 600F4,200-400,24-70,14-24,Flash +beamer,2 pro bodies and leads into it, The great thing about the bag is that it has an extendable handle and wheels so the airport staff wont see you struggling with the weight (until you are on the plane and try to lift it into the locker) Its an incredibly well made piece of kit and has some nice features like a rain cover, built in steel rope, backpack straps incase you decide to have it on your back and lots of pockets for filters etc, And one of the best features is that it doesnt 'scream' Photographer, It just looks like a normal case, Not cheap but an investment and if it makes air travel easier then its well worth the initial outlay, Next month i am off to Colorado so that will be its first real test although this coming weekend i am off to the Smokey mountains again so will be taking it then as well

Dave
Wednesday, 8 April 2009
Gear we use and Abuse - Graduated Filters
Although Dave and I are primarily wildlife photographers, we both do a bit of landscape photography too. There is a natural fit really with the places that we go and see.
Now the best landscape photography is all about light and how we use it to the best of our ability. The same scene can have many different looks as a result of the different light from the different times of the day and at different times of the year with the sun is at a different height.
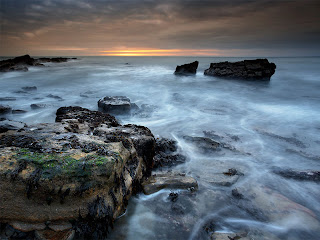
One of the tools that we can use to help us control that light is the Neutral density graduated filter, or ND grad as they are known for short.
The image above used a 2 stop hard edged ND grad to hold back the brighter sky and allow me to get detail in the much darker foreground.
Both Dave and I use the Lee Filters system. It is quite expensive as filter systems go, but as the old mantra goes 'You get what you pay for'.
Today I will cover just the resin filters that I use. Later blogposts will cover how we attach to the camera and also the use of polarising filters.
Lee sell ND grads in sets of three ranging from 1 stop to 3 stops, which they sell 0.3, 0.6 and 0.9. The number of stops indicate the amount of light that they 'hold back'.
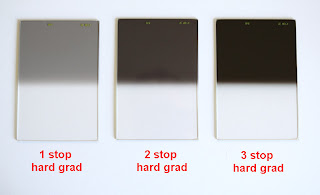
This image shows the full set of the hard edge grads. the term hard edge refers to the transition from the filter through to the clear. Hard meaning the transition is short and soft where it is more gradual as you will see below.

On this image you can see the difference in the transition between hard and soft.
I would tend to use the hard edge when I shooting seascapes like the image above and then use the soft edge when I might have some parts of the image in the filtered part where I want less filtration. You have to be very careful, particularly with mountain landscapes that you don't end up with heavily darkened parts of the scene as well as the sky.
This is one area where I use a special filter that I had made to order which is the blending filter (last filter on the right in the image).
This filter goes from 3 stops at the top and blends evenly to zero at the bottom with no harsh edge stops. This is one of my favourite and most often used filters to give methat gradual transition and avoid the obvious steps.
One useful tip I learned was to use the DOF preview button to better see the effects of the filter. More modern cameras have live view and with a combination of that, the histogram displayed and the DOF button depressed, you really can see every bit of information you need and mistakes or wasted shots really shouldn't occur - but we will still make those mistakes - I know I do.
So look out for future posts on the rest of the system and polarisers
Martin
Now the best landscape photography is all about light and how we use it to the best of our ability. The same scene can have many different looks as a result of the different light from the different times of the day and at different times of the year with the sun is at a different height.

One of the tools that we can use to help us control that light is the Neutral density graduated filter, or ND grad as they are known for short.
The image above used a 2 stop hard edged ND grad to hold back the brighter sky and allow me to get detail in the much darker foreground.
Both Dave and I use the Lee Filters system. It is quite expensive as filter systems go, but as the old mantra goes 'You get what you pay for'.
Today I will cover just the resin filters that I use. Later blogposts will cover how we attach to the camera and also the use of polarising filters.
Lee sell ND grads in sets of three ranging from 1 stop to 3 stops, which they sell 0.3, 0.6 and 0.9. The number of stops indicate the amount of light that they 'hold back'.

This image shows the full set of the hard edge grads. the term hard edge refers to the transition from the filter through to the clear. Hard meaning the transition is short and soft where it is more gradual as you will see below.

On this image you can see the difference in the transition between hard and soft.
I would tend to use the hard edge when I shooting seascapes like the image above and then use the soft edge when I might have some parts of the image in the filtered part where I want less filtration. You have to be very careful, particularly with mountain landscapes that you don't end up with heavily darkened parts of the scene as well as the sky.
This is one area where I use a special filter that I had made to order which is the blending filter (last filter on the right in the image).
This filter goes from 3 stops at the top and blends evenly to zero at the bottom with no harsh edge stops. This is one of my favourite and most often used filters to give methat gradual transition and avoid the obvious steps.
One useful tip I learned was to use the DOF preview button to better see the effects of the filter. More modern cameras have live view and with a combination of that, the histogram displayed and the DOF button depressed, you really can see every bit of information you need and mistakes or wasted shots really shouldn't occur - but we will still make those mistakes - I know I do.
So look out for future posts on the rest of the system and polarisers
Martin
Thursday, 12 March 2009
Gear we use and abuse-Extension Tubes

I get asked or see on forums questions about the difference between an extender or an extension tube, I covered the extenders last time-basically its a small lens that fits between the body and lens that magnifies the image, An Extension tubes fits the same as an extender but it is tube as the name says with no glass,What it does is move the lens away from the Camera bodies focal plane which make it possible to focus closer than the lens would normally allow, Camera lenses do not have any limitations in focusing away-you can focus at infinity but there are limitations in focusing close,My 600 has a minimum focusing distance of 5.5m, If i want to photograph a small plant/butterfly or bird with it they may be too small in the frame but if i put an extension tube on i can move closer and make it larger in the frame, Why use such a large lens for a small subject-well a long lens will throw the background nicely out of focus and give you some distance from skittish subjects like butterflies and dragonflies, You can use an extension tube on ANY lens unlike an extender,There is no glass so it doesn't degrade the image in anyway,The downside is that you loose the ability to focus at infinity so you can shoot closer but not at distance, Extension tubes come in a variety of sizes, Mine are a set of 12mm/20mm and 36mm and made by Kenko, I don't see the point in buying the expensive versions from the camera manufacturers when no glass is involved, My ones allow AF to work along with all electrical signals to the body and as i don't use them a lot they more than fit my needs, You can use then individually or as a pair or a complete set stacked depending on how close you want to get, One combo that works very well is a 300 F4 lens which has a good close focusing distance already combined with some tubes make a great kit for butterflies and dragonflies, You can increase the magnification when used with a macro lens to go beyond 1:1-very versatile and not overly expensive-A good addition to your camera bag,They are not going to replace a macro lens just enhance other lenses that you have for certain shooting circumstances
Here are some examples of how it works,I took these shots of a perch above one of my feeders,There are in order 600 only,600+12mm tube,600+20mm tube,600+36mm tube and 600+all tubes stacked, I notice when using some of the tubes with the 600 that i am getting some vignetting or darkening at the corners which is something i haven't had before so will need to shoot some without the hood to see what's causing it but it gives you the idea,
.jpg)
.jpg)
.jpg)
.jpg)
.jpg)
Tuesday, 10 March 2009
Gear we use and abuse-Extenders

To get a little closer to our subjects and to give some flexibility when using primes i use extenders, I use the Nikon 1.4x and 1.7x, They do make a 2x but i havent read many good things about them, Like the Canon 2x you either get on with it or you dont, All extenders will affect image quality as you are putting extra glass for the light to get through, 1.4x extenders have little effect on IQ and used correctly the 2x can give very good results,Firstly lets get something straight-They are not a cheap alternative to getting a cheap long lens so dont rush out and buy one for your budget 75-300 thinking you will get a good cheap 600mm lens,They are designed for top end lenses-Fast primes in particular but will also work very well on fast zooms like the Nikon 200-400, They do have an effect on your shutter speed, A 1.4x will take 1 stop of light away so instead of getting 1/250 you will get 1/125, A 2x will take 2 stops so instead of 1/250 you will get 1/60-a big difference,The Nikon 1.7x takes 1.5 stops of light, If you think you need good long lens technique with a 500mm lens then it needs to be doubly good when used with a 2x-only the biggest best tripod or ideally a beanbag will give good results with extreme focal lengths,Another thing to think about when using one is that the view finder will get slightly darker as the light fights its way through the extra glass and that 2 stops of light from the 2x will make your F4 lens an F8 lens and the 1.4x will make the F4 lens a F5.6 lens,This means that you will need good light and may need to increase your ISO to compensate for the slower shutter speed, To get the best IQ i would advise not to shoot wide open,This is not such a problem with the 1.4x but a 2x needs at least an extra stop down to bring good results,On my old 500mm F4 lens when using a 2x i would set the aperture to F11, This i found gave very good results in good light, Most people i know don't like the 2x and complain that results from it are rubbish-its all down to set up and technique, I would advise to only use an extender when you need to and only on the best lenses,
To show the difference they make here are 3 images-The first with a 600 only, To its right is a 600+1.4x and below the 600+1.7x,The good thing about extenders is that they do not affect the minimum focusing distance


Dave
Sunday, 8 March 2009
Gear we use and abuse-Dust Busting

There is nothing worse than spending a day shooting birds in flight or something with a plain background only to find when you download the images that they are peppered with dust and you then have to spend hours of extra processing to remove them,Most cameras these days come with a dust shaker on the sensor to help remove the problem (except Nikon D3/X) but it doesn't do the job completely and there will be times when you need to do something about it, My Canon 1DMK3 came new with dust on the sensor and rather than send it back and wait for a new one or even send it straight in for a service (first canon service gives a free sensor clean) i had to decide how i was going to remove the dust myself,There are many options on the market today but the main ones are to use a blower which can blow more dust onto the sensor,Wet wipes with Eclipse fluid which will help not just remove dust but also oil/grease spots that may come off of a new shutter and a small device called an Arctic Butterfly,This is my chosen method of dealing with dust on the sensor,Its very simple to use if you obey a couple of rules,Firstly only every clean your sensor with a newly fully recharged battery,If the shutter comes down when you are working in there its going to be expensive to replace, Secondly only clean your sensor in a relatively clean envirnoment-
 i go outside on a still day(dont want pollen on the sensor) and when using the device NEVER SPIN IT INSIDE THE CHAMBER, So with a fresh battery you need to go into the menu on your camera and find the open shutter for cleaning mode,Spin the butterfly 3 times for a few seconds to charge the bristles and then press the shutter button to open the camera up.Keeping the opening downwards carefully put the brush onto the sensor and lightly brush from one side to the other,Once you made a sweep take the brush out and give it a spin then go back in and repeat until the sensor is completely covered,I do this in both directions,Make sure that you do not touch the sides of the sensor with the brush as you may drag oil/grease onto the sensor which will then need a wet clean,Once you are happy that you have covered all the sensor put the cap back onto the camera and turn it off then turn it back on and you will hear the shutter close and the job is done, To check to see if the sensor is clean set your camera to F22 and take a picture of a clear sky and down load the image,any dust spots should be obvious,There are a few different brushes in the range,I use the Arctic Butterfly 724, Its a great tool if you travel as there are aircraft friendly unlike having to carry fluids with you and if you are Safari you can quickly clean you sensor each evening saving lots of time cleaning the images up when you return, I have been using one of these devices for a couple of years and i highly recommend them,Available at most Good shops,If you go to the Visible Dust web site there are training video's showing exactly how to use them
Dave
Thursday, 5 March 2009
Gear we use and Abuse - Gitzo SLV1321 Head
Well not a true tripod head as such but an extremely worthwhile addition to add to your Gitzo tripod legs, assuming you have the right model for it to work on.
Dave alerted me to this last year and was in a couple of minds as to the perceived value of this initially. But I trusted his judgement and bought one to fit to my GT5540LS. He also mentioned it briefly here, but I thought I would just add a little more from my perspective on this fine bit of kit
Simple to fit, just undo the bolt at the head of the legs to remove the top plate and it fits straight in. Do up the bolt again and you are sorted. Fit whatever head you are using and you are ready to roll.
So what does it do for you?
Well, when you are using panning type heads such as the Wimberley or in my case the Arca Swiss with the Sidekick for my 500, to ensure that you maintain a level pan, it is essential that the head is level.
Now we have all messed about for ages, adjusting this leg up a bit, reducing that one, and by the time we have finished faffing about the light or subject have gone!!!.
Well with this little addition, you can get the position roughly right, then with a quick unscrew release of the centre column, you can rapidly level the head using the built in spirit level.
It takes longer to type those few words than do it.
I have found it a great benefit since I have been using it, and it has reduced my set up times when I get to a location, which can make the difference to getting the image or not.
It works just as well for landscapes as well, as I found out last week on Mull.
Downsides? - well if you want to operate at just above ground level, you have the short column and the additional overall height that the head will sit to contend with. So not as good in that context, but I also carry the original top plate should I need to change over, although I also use the Skimmer Pod as an alternate that Dave mentioned previously.
Pictures of the SLV head can be seen here.
Martin
Dave alerted me to this last year and was in a couple of minds as to the perceived value of this initially. But I trusted his judgement and bought one to fit to my GT5540LS. He also mentioned it briefly here, but I thought I would just add a little more from my perspective on this fine bit of kit
Simple to fit, just undo the bolt at the head of the legs to remove the top plate and it fits straight in. Do up the bolt again and you are sorted. Fit whatever head you are using and you are ready to roll.
So what does it do for you?
Well, when you are using panning type heads such as the Wimberley or in my case the Arca Swiss with the Sidekick for my 500, to ensure that you maintain a level pan, it is essential that the head is level.
Now we have all messed about for ages, adjusting this leg up a bit, reducing that one, and by the time we have finished faffing about the light or subject have gone!!!.
Well with this little addition, you can get the position roughly right, then with a quick unscrew release of the centre column, you can rapidly level the head using the built in spirit level.
It takes longer to type those few words than do it.
I have found it a great benefit since I have been using it, and it has reduced my set up times when I get to a location, which can make the difference to getting the image or not.
It works just as well for landscapes as well, as I found out last week on Mull.
Downsides? - well if you want to operate at just above ground level, you have the short column and the additional overall height that the head will sit to contend with. So not as good in that context, but I also carry the original top plate should I need to change over, although I also use the Skimmer Pod as an alternate that Dave mentioned previously.
Pictures of the SLV head can be seen here.
Martin
Saturday, 14 February 2009
Gear we use and abuse-The little things
Its not just the sophisticated camera bodies and super sharp lenses that help us to make an decent image, There are some small unsung heros that play their part, Here are 3 items that i guarentee will improve your images
Item 1-The Double Bubble
Placed in your hot shoe you will have perfectly straight horizons and level lakes and wont need to crop your images or tilt your head when looking at them, Use for all your photography not just landscapes

Item 2-The remote release
Dont suffer from camera shake again as you wont need to touch your camera,Compose you image and make sure that the camera is locked down and press the remote without touching the camera/lens and viola a perfectly sharp image-obviously you cant use this for say birds in flight but for a lot of your photography this will be a god send,

Item 3-The off camera flash cord
Sick of getting red eye(squirrels and people) green eye (cats-tigers etc) or even white eye (badgers) well if you move your flash away from the cameras focal plain then you wont, The remote release cord will give you the freedom to move the flash away from the camera and give different lighting effects but the main one is not to have coloured eyes,Here you can see it with the flash on a special wimberly bracket attached to my wimberly head and sitting above the lens which means i can go from landscape to portrait without moving the flash-of course you can simply just hold the flash high in one hand and shoot with the other-either way it will improve your images when using a flash gun

Item 1-The Double Bubble
Placed in your hot shoe you will have perfectly straight horizons and level lakes and wont need to crop your images or tilt your head when looking at them, Use for all your photography not just landscapes

Item 2-The remote release
Dont suffer from camera shake again as you wont need to touch your camera,Compose you image and make sure that the camera is locked down and press the remote without touching the camera/lens and viola a perfectly sharp image-obviously you cant use this for say birds in flight but for a lot of your photography this will be a god send,

Item 3-The off camera flash cord
Sick of getting red eye(squirrels and people) green eye (cats-tigers etc) or even white eye (badgers) well if you move your flash away from the cameras focal plain then you wont, The remote release cord will give you the freedom to move the flash away from the camera and give different lighting effects but the main one is not to have coloured eyes,Here you can see it with the flash on a special wimberly bracket attached to my wimberly head and sitting above the lens which means i can go from landscape to portrait without moving the flash-of course you can simply just hold the flash high in one hand and shoot with the other-either way it will improve your images when using a flash gun

Wednesday, 28 January 2009
Gear We Use and Abuse - Portable disc storage
 One of the challenges we face on longer trips is that of image storage. With cameras having greater resolution and consequently larger file sizes, we need to think carefully about how we will protect our precious images until we get them back to the 'safety' ?? of our hard drives.
The options I have used over the last few years have been varied and potentially cumbersome, particularly when going overseas. I solved all my ills this time last year before I went to visit Dave in Switzerland, I knew I would not be able to take the laptop and I knew or hoped I would be coming back with many images.
I had used an old 20GB portable Flashtrax, which was unbelievably slow and battery life was awful, but it got me through a few trips and with the laptop meant that I could save my images to two locations.
It is no good saying " I'll just take plenty of cards" - they get lost, stolen or corrupted - extremely rare I grant, but you have NO back up.
It is no good saying " I'll just take plenty of cards" - they get lost, stolen or corrupted - extremely rare I grant, but you have NO back up.
One portable device also is not back up - again the same rules apply, and of course there is the old IT adage that a hard disc has two states - failed or about to fail!!
A good friend had given me the nod about the HyperDrive Space device, which had subsequently been updated with the Colourspace. At the time, the main route to getting these was to import from the US, but a little fishing found that Digital Depot had just started importing. So a few phone calls later, a bit of wheeling and dealing and two were on their way.
Two? - Yes as I wanted true back up. The images show the units and the screen interface. I have been using both devices for twelve months now, they have not missed a beat for me and done everything I have needed. Battery life is excellent and I have never actually needed to use the little external 4 x AA battery caddy that I also bought.
As you can see from the size compared to a CF card, they are pretty small. For full specs visit the Hyper Drive site. They have slots for all card types in current usage and for me that is both CF and SD with the 1Dmk3. Load and download speeds are incredibly quick and have never caused me any issues.
When flying, my gear is my ONE item of hand luggage, so once I have sorted all my lenses out there is no room for a laptop any more, so a newer and neater option was needed.
A good friend had given me the nod about the HyperDrive Space device, which had subsequently been updated with the Colourspace. At the time, the main route to getting these was to import from the US, but a little fishing found that Digital Depot had just started importing. So a few phone calls later, a bit of wheeling and dealing and two were on their way.
Two? - Yes as I wanted true back up. The images show the units and the screen interface. I have been using both devices for twelve months now, they have not missed a beat for me and done everything I have needed. Battery life is excellent and I have never actually needed to use the little external 4 x AA battery caddy that I also bought.
As you can see from the size compared to a CF card, they are pretty small. For full specs visit the Hyper Drive site. They have slots for all card types in current usage and for me that is both CF and SD with the 1Dmk3. Load and download speeds are incredibly quick and have never caused me any issues.
Since I bought this model, there are now another couple of variants out that may or may not be what you need. I know I do not need to change for a while. The units I have use a standard laptop 2.5" drive and can easily be interchanged if I wish. I chose the 160GB models that were a reasonable deal at the time, and have served all my needs on trips of up to ten days so far with ample space to spare, bearing in mind I have to cater for two photographers needs in that allowance for my partner Sue.

There are a number of other manufacturers who make similar devices including Canon, Epson and Jobo. I chose the HyperDrive for value for money, capacity, speed, size convenience and above all they were recommended from a couple of sources I consider to be trustworthy - always a good recommendation.
One final reminder is not to keep them together in the same bag while travelling - lose one, lose both - keep them well separated, and if you have a long suffering partner with you, give them one to carry for you.

Martin
One final reminder is not to keep them together in the same bag while travelling - lose one, lose both - keep them well separated, and if you have a long suffering partner with you, give them one to carry for you.

Martin
Tuesday, 13 January 2009
Gear we use and abuse,Head and Feet

So you have saved enough money to get the Long lens you have been dreaming about for a long long time, Now other questions come up-Is my tripod and head up to the extra weight and if not what do i get,Well i use a Gitzo 1548 tripod and will cover lens support next week,Tripod heads-well there are hundreds of different designs,Gimbal,Ball,3 way, you have to consider carefully exactly what you want the head to do, Either way if you are using a 500 or 600mm lens its going to be expensive, You have spent a lot of money on the lens and there is little point in using it on a cheap head,If like me you want to cover animals and birds that move then you will need a head that has a nice smooth action so that once you have focused on the subject you can 'pan' and get a nice sharp image, I use a Wimberley Gimbal head-the WH200 to be exact-seen here with the flash bracket attached,Not cheap but beautifully made and very smooth allowing you to move in a left to right and up and down movement with a single finger when using a 600 lens,This also means that if you are panning, your tripod must be dead level-a real pain to do until i found the leveling head and with a quick release of the knob underneath you can quickly level the head and then then tighten the knob and job done all in a few seconds,Particuarly good if you are shooting when standing in water with the lens a few inches from the surface,
 The leveling plate has a release handle on it so that once released you can quickly remove the Gimbal head and put another head on for say landscapes,For this i use an Arca Swiss ball head, Again beautifully made and i have had mine for a few years-now in need of a service and once done will last many more years, The thing that both heads have in common is that they accept a 'wimberley' type lens plate,these have a dovetail cut into them and clamp into the head,When i moved to Nikon i decided that i needed to save as much weight as possible and so doing i bought new feet for my 200-400 and 600 lenses,
  The new feet are from a company called 4th Generation (wimberley do a similar product) they are made from a high grade alloy and have the dovetail already cut into them,These have a lower profile than the standard feet from Nikon and Canon and are very light-another quality product and come with an allen key and new screws-fitted in minutes and the low profile foot leaves enough space to get a grip if you carry your lens by the foot as i often do, They have a nice security feature to,If you carry your camera/lens attached to your tripod over your shoulder and the head jaws come loose there are 2 small screws that protrude to stop the camera/lens coming out of the tripod head and come crashing to the ground-you will see that on the 600 i only have 1 fitted the reason for this is that i like to get everything balanced and if i use/dont use an extender the screw gets in the way,so i always make sure that i have 2 fingers through the camera strap if carrying it over my shoulder just in case
Sunday, 11 January 2009
Gear we use and abuse - Its in the Bag
 Now this is a difficult one as buying a new camera bag is like buying a tie-what one person likes another doesn't so all I can tell you is what I use and why. I use Lowepro and have done since 1999 when I bought a secondhand Lowepro Super Trekker to go travelling with for 6 months, I needed something that would take all the kit I had at the time-23KG in total and it swallowed it easily and would have taken more. It was massive, too big in fact and once I had finished my travels I rarely used it. I subsequently bought a Lowepro Nature trekker AW for my day to day photography and still use it as you can see here it is big enough to carry a Nikon 200-400, Body, 14-24, 24-70, extenders plus cards batteries etc. Fine for a days shoot and comfortable which after protecting your investment is very important, I have travelled extensively with this bag around the world and have used it almost daily trekking across the Jura and Alps when I lived in Switzerland and yet it is still as good as new-nothing has broken on or inside the bag.
I also use this bag as a landscape bag and when I don't have the 200-400 along with the body and lenses in it it carries Lee filter ND grads and polariser with the Lee filter holder,A very versatile bag and one that stood the test of time and I would thoroughly recommend it.
My other bag which has now become my main bag is a Lowepro Pro Trekker AW-The AW stands for All Weather and the bags that carry this tag have a pull out cover that goes over the bag and keeps the insides dry should you get caught in the rain. I have only had this bag a couple of months. When I switched to Nikon I decided that as I was getting a full frame body I didn't want to loose out on the crop factor that the 1D3 had given me so I would increase the focal length of the lens and opted for the 600 in place of my previous 500. Now the 600 is way bigger than the 500 and it then limited me to a handful or less of bags to carry it in. I looked at the Kata and Tamrac range along with a couple of others but ended up back at the Lowepro camp. As you can see the Pro Trekker carries a lot of kit.


The 600 fits in the bag with a body attached (lens hoods reversed) along with a spare body, 14-24, 24-70, 1.4 and 1.7x extenders, flash with Better Beamer, leads, remote, batteries, cards etc. etc. It carries a vast amount of kit and weighs a tonne when loaded. So I use it more for protection of my gear than walking any distance with.
Normally when I get to a destination I carry what I need in the smaller bag and have the 600+body on the tripod over my shoulder. The Pro Trekker is made from the latest material and feels very nicely put together. These bags are not cheap and its nice when you receive it to think that you have something that is going to last some years. The Pro Trekker comes with 2 side bags as you can see in the picture. These are useful for carrying another couple of lenses and I tend to keep a 180mm macro in one just in case. You could carry some water in them as it wouldn't be long before you build up a sweat.
Normally when I get to a destination I carry what I need in the smaller bag and have the 600+body on the tripod over my shoulder. The Pro Trekker is made from the latest material and feels very nicely put together. These bags are not cheap and its nice when you receive it to think that you have something that is going to last some years. The Pro Trekker comes with 2 side bags as you can see in the picture. These are useful for carrying another couple of lenses and I tend to keep a 180mm macro in one just in case. You could carry some water in them as it wouldn't be long before you build up a sweat.
One problem I have had over the years and one that I don't know how to stop is getting a sweaty back when carrying a back pack for any distance. When trekking in Switzerland you could be walking for an hour or more to find Ibex and then spend a couple of hours shooting them whilst sitting with a wet back-uncomfortable and not healthy. This is a problem that all backpacks seem to have and there is no real answer as the bag has to rest against your body. Anyway these are my day to day bags. Travelling by aeroplane now throws up a different set of problems especially now I have the 600, and I will be looking at the Think tank range to solve that problem, as I know Martin has been using bags from this range.
Dave
Monday, 5 January 2009
Gear we use and abuse - Dave's Kit Review

My current photographic equipment:
Bodies:
Nikon D3 -Full Frame
Nikon D300-Cropped Sensor
Lenses:
Nikon 14-24F2.8
Nikon 24-70F2.8
Nikon 200-400F4 VR
Nikon 600F4 VR
Sigma 180F3.5 Macro
Nikon 1.4x extender
Nikon 1.7x extender
Flash-Nikon SB900 and Better Beamer
Binoculars-Nikon Monarch 10x36
Gitzo 1548Tripod with Gitzo self levelling base
Wimberly Mk2 Gimbal head
Arca Swiss B1 ball head
Lenscoat protection to Nikon 200-400 and 600 lenses
Bags-Lowepro Pro trekker and Nature trekker
For landscapes-Lee filters Polariser and ND Grad filters 1, 2 and 3 stops
Studio Equipment:
Elinchrom D Lite 4 kit with Elinchrom 135cm Octa softbox
Sekonik 358 handheld light meter
Bodies:
Nikon D3 -Full Frame
Nikon D300-Cropped Sensor
Lenses:
Nikon 14-24F2.8
Nikon 24-70F2.8
Nikon 200-400F4 VR
Nikon 600F4 VR
Sigma 180F3.5 Macro
Nikon 1.4x extender
Nikon 1.7x extender
Flash-Nikon SB900 and Better Beamer
Binoculars-Nikon Monarch 10x36
Gitzo 1548Tripod with Gitzo self levelling base
Wimberly Mk2 Gimbal head
Arca Swiss B1 ball head
Lenscoat protection to Nikon 200-400 and 600 lenses
Bags-Lowepro Pro trekker and Nature trekker
For landscapes-Lee filters Polariser and ND Grad filters 1, 2 and 3 stops
Studio Equipment:
Elinchrom D Lite 4 kit with Elinchrom 135cm Octa softbox
Sekonik 358 handheld light meter
 I changed from Canon to Nikon in Sept 2008 for many reasons but mostly as had been an early adapter of the Canon 1D MK3 , I had all kinds of problems with the AF which has been well documented, Canon Suisse (I lived in Switzerland at the time) were next to useless in dealing with the problem and it was only after I showed files from the 5D against the MK3 did they exchange the body. I had had the body over a year by then and it was too little to late as far as I was concerned-a real shame as when I got it right it was a terrific camera. The other reason I changed was that I was about to move Stateside and decided it would be better to sell all my equipment in Europe and with a healthy exchange rate buy new in the States.
This then gave me options as I had a fist full of dollars and could choose what would suit me best at that time-which turned out to be Nikon. A decision that wasn’t taken lightly as I had shot with Canon for 14 years and knew the camera like the back of my hand but its just a tool and one that you need 100% confidence in. Nikon's wide angled lenses have always been great as is their flash system but with the new D3 body and new Long lenses (if you can get them) meant that they had a total system. I am awaiting the new 70-200 F2.8 to fill the gap I have in my lens collection. The current model will work perfectly with the D300 but isn’t so good with the new Full Frame models, but as I would like it for general photography and portraiture as well as wildlife I will wait.

So its all still new to me and I still find myself trying to twist the lens the wrong way when talking off the camera and zooming out rather than in but I am getting there and am so far extremely impressed with the overall quality feel of the equipment and the results that I have been getting from it. The D3 was an easy choice as its had such rave reviews, with consistant AF , great build quality, good ergonomics (once you get used to it) and a battery that lasts forever. The downsides so far are a loud shutter (I miss the quiet mode of the Canon), no dust removal (The Canon wasn’t perfect but every little helps) and no live histogram which is a feature that I loved on the Canon (if there is one can somebody tell me where it is please) - All in all though a truly great camera body. The image quality is top notch and the high ISO is legendary, but I needed a back up camera and after spending weeks deliberating I decided on the D300 as seemed a well spec’d camera at a reasonable price with the advantage of having a cropped sensor for more distant subjects. The thing that really surprised me was just how good the D300 really is. The image quality is excellent and now with the latest firmware upgrade the AF is as good as the D3 with the added benefit of the AF points covering a larger part of the frame-great for composing a shot. The AF really is excellent and from people who have both Canon and Nikon systems working side by side they say that the D300 out performs anything Canon currently has on offer and I have to agree-for the money it has to be the best camera on the market. Now nothing is perfect and I will only shoot the D300 up to ISO 800, above this and its D3 territory which excels at ISO’s up to 1600 and above without need for noise reduction software. When I go out for wildlife I find that I take the D3 attached to the 600 and have the D300 attached to the 200-400 and add extenders if required
.
.
 If the birds are distant then a quick swap over of the bodies gives maximum reach. The 200-400 has been around for some time and has always been regarded as a brilliant lens, I have never understood why Canon hasn’t bought out a similar model and feel they are really missing out here. It was one good reason to change to Nikon. A pricey lens like all Nikon Pro lenses but for wildlife its brilliant, as it is light enough to handhold and with a very good range for general wildlife shooting, working well with extenders and has great IQ-What more could you want in a lens. The 600 is a true beast of a lens-huge is one word and after using a 500F4 for years bulky-not for handholding unlike the 500 and not the best lens if you hike, but the new Nikon 600F4 VR (nano crystal model) focuses down to 5m which is an incredible feat and a bonus for shooting small birds from a hide. It is incredibly expensive but the quality shines through in both IQ and build quality-will last for many years unlike my back. Both cameras work well with a 1.4x attached but I find that the 1.7x does slow the AF down enough to be a pain for birds in flight and try to avoid using it in those situations.
 I have only used the wide lenses for interiors and portraiture and a couple of sunsets so haven’t really had a chance to put them through their paces. What I can say is that in a studio, the 24-70 is a dream giving great portraits with lots of detail and great sharpness when used with the D3. You can see the sunset taken with the 24-70 in the blog. The 14-24 has had rave reviews from everybody that use it and even some Canon photographers are using it with an adapter, I have only had a play really and have shot some interior images and some test shots which are really sharp right to the edges but will need to use it more to give a better review. The down side of having this lens is the bulbous front element making use of filters next to impossible. The only chance I have had of using the Sigma 180 Macro was when my dog walked in from the garden with a preying mantis stuck to his beard, I managed to get the mantis onto a stick and take a few shots before it went on his way. Depth of field is incredibly small when using this lens at 1:1 so a very small aperture needs to be used so make sure your D3 sensor is clean (its only real drawback) but the images proved to be very sharp and have a nice contrast. Why the Sigma and not the Nikon? -well I have seen some truly great images taken with this lens on forums that I visit and know some pro’s that use it and at the price it’s a bargain.
 Nikon have always had a good reputation for their flash system. The SB900 came out as I was about to make the switch and while it seemed expensive, you do get diffusers and filters with the gun which you don’t get with other makes and its also large compared to the previous version the SB800. What limited time I have had using the gun with a Better Beamer have given good results but as I say I haven't used it enough to get a good feel from the gun. There have been reported problems with over heating and am sure that it will sorted soon, it’s a problem I have yet to encounter. I have plans to shoot the possum and grey fox that hang around my garden at night so will be needing to purchase at least another 2 flashguns but will either get second hand SB800 or 600 models for this.
So to round up, so far so good - everything works better than expected and I had high expectations, I feel that I made the right choice at the time of purchase. No system is perfect but for me this as close as it comes. As time goes on I will add to this general over view of the system and see what else shines or doesn’t. Keep watching this space.
Dave
Subscribe to:
Posts (Atom)