
Following on from a thread over at Canon Fodder forums , I thought I would put down a few musings of the whys and wherefores of using flash when shooting wildlife.
Firstly, you need to understand why you want to use it and then secondly will it suit the subject matter, and then finally and in my book most importantly will it cause your subject any distress.
Remember welfare of the subject comes first.
But lets assume you have ticked all those boxes to your satisfaction or at least the second two, but why?
Well there are some times that the ambient light is too strong or nor sufficient.
 Too strong? - We have all seen wedding photographers using flash in bright sunlight to put some light into harsh shadows. Same with wildlife. It can work.
But we may have situations with very flat light or insufficient light and we might want to just pop a little bit of fill light in just to balance the image.
Now this Moorhen isn't a particularly brilliant image, but it was shot with the 500 + 1.4, so 700mm @ f 5.6, 1/125 sec and ISO1600, and M Mode. Flash was set to M mode with the flash extender. Now the EOS flash system does a pretty good job of flash metering, and am sure the Nikon system is at least as good.
 So this is a ambient balanced exposure. What the flash has done has put a decent amount of detail and colour into the bird in really dark conditions.
You will see one flaw that you need to be aware with this type of shot. There is a very slight shadow cast behind the bird as a result of the flash being raised above the centre line of the lens. It is slight but there so one thing to remember when using it for this type of image.
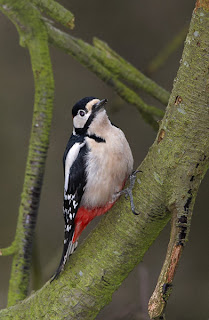
It works a little better with the Great Spotted Woodpecker, as the shadow cast has nothing to land on. But again very careful observation will show some unnatural catch lighting in the eye with reflection from the back of the retina. It is not too bad, but don't try with Owls - with their massive eyes you really will have a very ghostly apparition.
It has worked pretty well with the Robin below, particularly where you have a bright highlight sky behind. With careful dialling in of the power settings you can let the flash manage the exposure on the subject, and meter to underexpose for the background in the camera settings. So in this case, I underexposed the background by about 1 stop and set the flash exposure to give a zero compensation. Both camera and flash in M mode again.
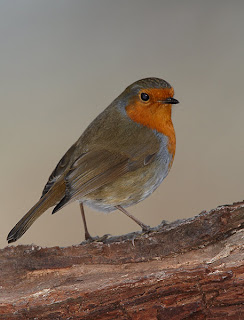 Again, you can see the eye reflection has it's problems, but the exposure is reasonably well balanced and certainly enables the colours to show well on a dreadful light day.
All shots were taken at ISO1600, and I have not used any noise reduction either in camera or post processing. However, if I wanted to print these I would run some NR on the backgrounds.
I used the Canon 580 EX flashhead with the Kirk Extender, which is essentially the same as shown on the opening picture of Dave's set up with the Better Beamer. They are recommended for lenses above 300mm and are said to be worth about 2 to 3 stops worth of additional distance. They basically comprise of couple of bits of plastic, designed for your particluar flashhead, with a stick on Fresnel lens on the front to concentrate the throw of the light. On the Canon, it is recommended to manually set the zoom setting on the head to 50mm, which is I guess the optimised distance for the light to lens gap.
But we will make that the subject of another blogpost at a later date.
Now this Moorhen isn't a particularly brilliant image, but it was shot with the 500 + 1.4, so 700mm @ f 5.6, 1/125 sec and ISO1600, and M Mode. Flash was set to M mode with the flash extender. Now the EOS flash system does a pretty good job of flash metering, and am sure the Nikon system is at least as good.
 So this is a ambient balanced exposure. What the flash has done has put a decent amount of detail and colour into the bird in really dark conditions.
You will see one flaw that you need to be aware with this type of shot. There is a very slight shadow cast behind the bird as a result of the flash being raised above the centre line of the lens. It is slight but there so one thing to remember when using it for this type of image.
It works a little better with the Great Spotted Woodpecker, as the shadow cast has nothing to land on. But again very careful observation will show some unnatural catch lighting in the eye with reflection from the back of the retina. It is not too bad, but don't try with Owls - with their massive eyes you really will have a very ghostly apparition.
It has worked pretty well with the Robin below, particularly where you have a bright highlight sky behind. With careful dialling in of the power settings you can let the flash manage the exposure on the subject, and meter to underexpose for the background in the camera settings. So in this case, I underexposed the background by about 1 stop and set the flash exposure to give a zero compensation. Both camera and flash in M mode again.
 Again, you can see the eye reflection has it's problems, but the exposure is reasonably well balanced and certainly enables the colours to show well on a dreadful light day.
All shots were taken at ISO1600, and I have not used any noise reduction either in camera or post processing. However, if I wanted to print these I would run some NR on the backgrounds.
I used the Canon 580 EX flashhead with the Kirk Extender, which is essentially the same as shown on the opening picture of Dave's set up with the Better Beamer. They are recommended for lenses above 300mm and are said to be worth about 2 to 3 stops worth of additional distance. They basically comprise of couple of bits of plastic, designed for your particluar flashhead, with a stick on Fresnel lens on the front to concentrate the throw of the light. On the Canon, it is recommended to manually set the zoom setting on the head to 50mm, which is I guess the optimised distance for the light to lens gap.
But we will make that the subject of another blogpost at a later date.
Now my technical skills with the flash can always be improved so if there any pearls of wisdom that I have missed then please let us know.
Martin
I recognise these images here Martin......bloody freezing wasn't it !
ReplyDelete