Before I start I need to issue a health check - there are many many ways to sharpen digital images - I know I have used many different ways to get to where I am now.
This is my way - it works for me. If your way works - great, stick with it but if it doesn't then here is an option for you to consider.
Before we start, lets just consider workflow.
I review my image with Breezebrowser Pro, check out link for Dave's review last month, using the view in HQ mode to see if the image is a keeper or bin fodder.
Once I have decided what I want to keep I convert the .cr2 file to a 16bit TIF - always. Not jpeg, not 8 bit.
I then post process, currently using Adobe Photoshop CS3. The image is generally still at original size unless I am doing a quick and dirty for a web post or something.
So global changes in the RAW processing, local changes using adjustment layer masks for levels, curves, sat, and selective colour.
Then I save the file as my master.
Now the next choice is what form of output do I go for. Once I have decided I will then crop or resize the image. I may, albeit rarely, run a bit of localised noise reduction using a layer mask in a separate layer and then only attack the noise areas, certainly not the main subject such as a bird, to avoid loss of detail.
Now I think about sharpening.
So I will show some quick screen grabs to illustrate.
 Take your master, save as a separate file and flatten any layers that you have to help make the file size more manageable.
In the layers pallette, drag and drop the background layer onto the 'Create a new layer' icon at the bottom left. This will give you a duplicate layer. On that bottom row of icons, you will also see a 'Add Layer mask'.
Click that and you will see a small white rectangle next to the duplicate layer.
Click back on the duplicate layer thumbnail, next to the new layer mask. This will ensure that the sharpening changes you make are being applied to the image and not the mask.
Then select Filter >Sharpen > Unsharp mask.
Set the zoom at 100% if you are sharpening for web/digital projection and 50% if printing. For the former, I would use about 50%, 0.3 and 0. I then do this a few times until it is just oversharpened in the window. Then click OK.
 Now on the full screen image at actual pixels, so Zoom, then actual pixels to get that, I then modulate the opacity of the layer using the percentage slider to fine tune the sharpening to exactly where I want it. If there are slight halos, I look to slide back until they have gone.
However, if they don't totally go, then don't fret - more later.
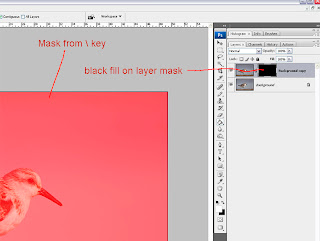
The next thing is I then click on the layer mask we added a bit ago, then select the paint bucket tool and fill the layer mask with black paint and all the sharpening disappears. Huh? I hear you say.
Stay with me.
Then click the \ key, select the paint brush tool, set the colour to white and start painting those areas of the subject you want sharp, and only those areas. The area you are painting will show as red so you can see where you have been. Just toggle the \ key on and off as you require to see the effects.
 Complete the image and check. Use the opacity slider just to re verify you are happy with the level of sharpening.
 Complete the image and check. Use the opacity slider just to re verify you are happy with the level of sharpening.
If you have any halos, you can actually paint then out again, by selecting the brush, colour black, set the brush to a small and hard setting and paint the halos into history.
Make sure you paint sharpening onto any areas of the scene that you think needs to be sharp.
Now I have shown a Sanderling here. I only want the bird and the sand that is in the line of the DOF in focus. If I sharpen the background, I might induce noise or sharpening artefact's, so this method will allow me to keep that creamy smooth. Particularly important when I am making A3 + prints.
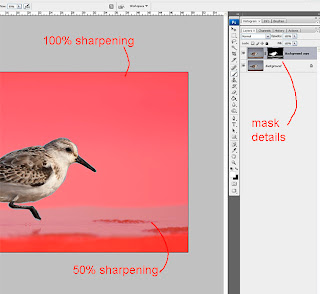 Also remember you can vary the levels of sharpening that you give an image across it by varying the levels of masking. If you have set the sharpening for one area at the optimum level, but you want a some but not as much in another area, then set the opacity of the brush tool to 50% or whatever is appropriate for your image and paint the sharpening out.
This might sound complicated, but once you have done it once or twice, it comes very quickly.
Now as I say, this works for me and if you have your own pet method, then do stay with it. But I have found I can avoid inducing or increasing noise, I can control the halos, only that part of an image that I want is sharpened.
if you try this, lets us know how you get on.
Now as I say, this works for me and if you have your own pet method, then do stay with it. But I have found I can avoid inducing or increasing noise, I can control the halos, only that part of an image that I want is sharpened.
if you try this, lets us know how you get on.
Scott Kelby shows a number of different ways to sharpen in his books that you might also like to look at.
Update: Replaced the last two images as the original ones showed you how to nicely sharpen the background and not the subject - apologies for the confusion
Martin
Update: Replaced the last two images as the original ones showed you how to nicely sharpen the background and not the subject - apologies for the confusion
Martin
I found a small alternative that takes a step out of your workflow - making it faster.
ReplyDeleteWhen you dupe the layer for sharpening, don't add the layer mask. Do the sharpening, adjust the layer opacity as you suggest then ALT click on the add layer mask icon, it adds a layer mask filled with black. Then follow on as before
Excellent article thanks Martin
ReplyDeleteDo you use a graphics tablet?
Pete
Thanks for that p4pictures and also your note Pete
ReplyDeleteYes - I do - I use the Wacom A4 Intuos - it is a stunning piece of kit.
Will do a gear review in the future
Martin