The single most important bit of kit I carry in my bag is my binoculars.
Not my camera or long lens? No.
If I cannot see my subjects to begin with then I have no hope of getting into a position to get images of them.
When I go out to photograph wildlife, I always tell my self that I am going to see the wildlife and if I can get a photo well that is a bonus. On days like these, that is sometimes hard to reconcile in your mind - but I try all the same. But the good thing about those times is that I was able to still enjoy watching because I had my binos.
Now these are very personal bits of kit and what some people like others really dislike.
But here are my thoughts based on many many years of bird and wildlife watching, even before the photo bug took hold.
Best size is generally 8 or 10 x. I have tried larger magnifications but it makes for blurry images due to movement, although you can get IS models, but the subject can be much harder to find. I once tried out the Canon 12 x image stabilised models and just found it so much more difficult to find the subjects, particularly the smaller birds in the trees.
I would also recommend getting at least 40 in the second number - the size of the object lens. The bigger the number, the brighter the image as more light is getting in. I have used the dinky 8 x 25 compacts but found them to be pretty poor for serious wildlife watching.
Now the final thing is how much to spend. Well it all depends on how serious you are, but essentially, as with camera lenses you generally get what you pay for. You can get reasonable working models from about £100 to 150 in the UK but as you spend more the image just keeps getting better.
If you don't believe me go to one of the Optics centre that are around some of the larger nature reserves. Pick up a £100 pair and then pick up the equivalent Zeiss, Svarokski or Leica, usually around the £1000 or more mark, and tell me you can't see a difference.
But you have to pick a pair that meets your price range.
I currently use a very fine pair from Opticron, 8 x 42 SRGA models. Conventional shaped binoculars, bright, sharp and pretty light. But that doesn't stop me lusting for the latest Leica HD models.
So never go out without them, as even if you don't get any photos, you will see so much more
Martin
Thursday, 30 April 2009
Wednesday, 29 April 2009
Use Protection-Be Safe
Now that spring is with us and summer is around the corner the weather is warming up and the bugs are coming out to play, we need to get our sensible heads on, Firstly we spend alot of time outdoors and need to take precautions against the sun, Cancer is a real threat and sunburn is just plain uncomfortable, Make sure high factor sun cream is applied regularly and take a cloth to keep your hands as dry as possible, Sun cream and cameras don't work to well, I had a Canon 5D -yes film- years ago that i took travelling and the hand grip peeled due to coming into contact with suncream and bug spray, So that brings me onto bug spray-nearly every country now has mosquitoes and not all of them are night time fliers, Early mornings and evening sessions become a pain in more ways that one, When shooting badgers in used to wear a wide brimmed hat and a net over my head to get some peace from the most annoying things on the planet, When shooting in foreign countries you may also need malaria tablets as well, Bug spray can help keep all biters at bay but most sprays and cream tend to be scented so be careful when trying to shoot animals like deer and downwind will be the only way to get close enough to shoot, If you are approaching a deer and he suddenly lifts his head and licks his nose then he knows you are around, As mentioned bug spray and camera gear don't work so either use gloves-i use a think cotton camo pair in the summer-or take a cloth and keep as much off of the cameras as possible, Whilst talking of bugs lets mention Ticks, Now they are not that common in the UK but they are around and where you find deer you will find ticks and ticks that can carry Lyme disease this is a very real danger to your health, Here in the USA Lyme disease is wide spread and not nice-flu like symptoms that if left untreated will cause lasting health problems, Get a friend or partner to check you for ticks, I have had them on me in Switzerland, France and India , Care is needed when removing them so as not to break the head off, I use a tick remover that i bought from a vets for my dog,Its like a minute claw hammer that you slide under the tick and slowly pull and twist at the same time, I was told that a tick breathes out of its rear end as its head is buried so a blob of vaseline over the tick will make it reverse out as it tries to get air, Sensible clothing with long sleeves and a wide brimmed hat will all help keep you cool and safe
Dave
Dave
Tuesday, 28 April 2009
Following on................
From this post I was asked to put up some more of the images I used in the portfolio but just before I put them up I would like to thank all of you who left kind comments for me. They are very much appreciated.

Brown Honey Fungus Armilleria Ostoyae
taken in Warwickshire
taken in Warwickshire
 Buachaile Etive Mor, Glencoe, Scotland
 Loch na h Alaise, Rannoch Moor, Scotland
Slavonian Grebe, Loch na Keal, Isle of Mull
Martin
Monday, 27 April 2009
Gear we use and abuse-Think Tank Security

As air travel is getting harder and harder for the photographer and with a trip or two coming up i decided to push the boat out and buy a new bag for my kit, Not just any bag but a bag designed specifically for the travelling photographer, The Think Tank security is designed to fit the maximum amount of gear into the bag and still meet airline requirements for over head lockers, I somehow managed to get my 600F4,200-400,24-70,14-24,Flash +beamer,2 pro bodies and leads into it, The great thing about the bag is that it has an extendable handle and wheels so the airport staff wont see you struggling with the weight (until you are on the plane and try to lift it into the locker) Its an incredibly well made piece of kit and has some nice features like a rain cover, built in steel rope, backpack straps incase you decide to have it on your back and lots of pockets for filters etc, And one of the best features is that it doesnt 'scream' Photographer, It just looks like a normal case, Not cheap but an investment and if it makes air travel easier then its well worth the initial outlay, Next month i am off to Colorado so that will be its first real test although this coming weekend i am off to the Smokey mountains again so will be taking it then as well

Dave
Sunday, 26 April 2009
Blow my own trumpet time
I recently put together a body of print work consisting of a total of 15 mounted prints, all at A3 size for submission to the Photographic Alliance of Great Britain.
Yesterday was judgement day!!!!
So while I was at the RPS Nature Group Exhibition at Smethwick looking at some fantastic images from the members in print and projected form, my carefully crafted work (?) was being poured over in deepest Surrey.
Well I received the good news yesterday evening that I have net the criteria so now have a Distinction i.e DPAGB.
The work I submitted consisted solely of wildlife and landscape images so though I would share some of them below.

Bittern at Slimbridge, Gloucestershire
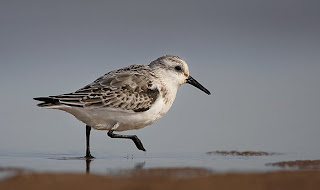
Sanderling at Titchwell, Norfolk
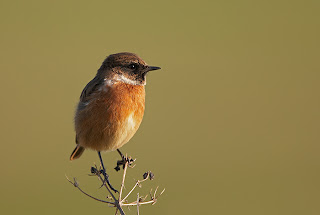
Stonechat at Cley, Norfolk
Martin
Saturday, 25 April 2009
Photoshop Zoom Burst

In the good ol days of film i would sometimes set your camera to get a long shutter speed-1 sec or more and then when hitting the shutter button smoothly zoom and you would get a 'zoom' effect on the image, I played with this a few time on plants and landscapes etc, The other day i shot for the first time a baseball game, The images came out great-very sharp but some of the backgrounds were a tad busy so i thought i would have a play and came across the zoom burst effect on Photoshop, I know its not a wildlife image but this effect can be used say on a lions head to draw the eye into it and give it a dynamic effect, I am not really one for manipulating images but to have a play around every now and again is a good thing, For the baseball image here i firstly went to filter>blur>radial blur.Then set to best quality,Zoom and i dragged the slider up to 100%.Hit the OK key and the whole image had the zoom effect, I then 'painted'the player back in with the history brush and carried on normally doing the levels,curves,sat etc, Its not an every day effect but it cleaned up the background and made the player really 'pop' out in the image
Dave
Friday, 24 April 2009
More News - WWF Wildlife Photographic Awards
While browsing today, I came across this piece about Photographic Awards from the WWF.
Some decent value to the prizes so might be worth a go if you are into this sort of thing.
Martin
Some decent value to the prizes so might be worth a go if you are into this sort of thing.
Martin
News - Canon Firmware and Software Updates
Thursday, 23 April 2009
Review-Hahmel Pro Remote Control

Heres a review that didn't start well and i thought it was going to be a slating, The postman delivered a couple of packages yesterday, 1 being a Think Tank case for my upcoming trip to Colorado,The other was a small package containing a Hahmel Pro Remote Control, I have read a couple of reviews in monthlies that intimated that this was a good product,Hahmel have been around a while and make quality products at good prices, I wanted a wireless remote since going over to Nikon, I used to use a Canon LC-4 which at around £300 is bloody expensive but i had it a few years and the wide angle wildlife shots that i got with it paid for itself time over, I don't use one a lot but they really do have their uses, So at around £35 or $60 it was a no brainer, The one for the Nikon comes with a hand remote and a transmitter that can go onto the hot shoe, The cord between the camera and transmitter has a break in it and you get 3 cords that fit into it for different bodies from the latest D3/X to the D1 series and every body in between-great,
 It also comes with all the batteries which is a bonus as nothing worse than getting a new toy and not being able to play with it straight away, So i put the right connector on for my D3 and D300 bodies and connected it to the camera,Firstly the pin connection is snug at best and takes some effort to get out, I set everything up and raised the antenna and pushed the button-its a hair trigger and if you have it set to high speed mode then you get 9 frames before you can think about it,so setting the camera to single shot i tried again,I noticed that the image didn't pop up on the screen and wouldn't until i disconnected the transmitter-strange i thought and then i could hear the stabiliser spinning without touching the button and it wouldn't switch off which would drain the battery, I removed it from the D3 and put it on a D300 with 14-24 (no stabiliser) but then i could here the focus hunting all the time without touching the button-i thought i had a dud and would need to call the service dept, I came upstairs to my pc and bought the unit with me, I had one last look and noticed that the connection in the cable wasnt fully snapped in-1 big push and SNAP in it went, i went to have another go and bingo everything worked, I set it back up in the garden and took a series of shots and the stabiliser worked ok turning off shortly after the shot and the images popped up on screen, I left the camera in the garden and went indoors with 2 walls between myself and the camera, pressed the button and bingo it took a shot so i paced 50m and took a shot and it worked fine -sunlight wont affect the performance as its radio controlled, The units are well made and nice and small,
  You can take the transmitter part off of the camera and use it as a normal corded remote as there is a button for that which is very handy,The hand piece has button for focus/shoot and a self timer button, It can used as BULB setting as well and both units have a 4 digit channel panel so you set yours so that others in the area wont affect it-well thought out and for the money amazing value, after the initial problems it all seems to work fine and you just need to remember to snap the cords together, I look forward to working with this piece of kit along with my D3 and 14-24 to get real close ups of the animals that use my garden, I will keep you informed of how things work out
Dave
Wednesday, 22 April 2009
Local Patch - Garden Update
Things are moving on well in the garden wildlife patch now.
Tadpoles are very active with the warmer weather now and a few are starting to sport rear legs now.
Water beetles (not sure what type yet - next study work is bug identification) and a lot of daphnia type pond life are also very active.
On the flower front, the first of the Cuckoo Pint or Lords and Ladies are up in the woodland patch. Ladies Purse has pretty much gone over now. A large yellow flower that looks a bit like Field Rape is out well now and is being feasted on its lower leaves. I believe this plant is Charlock. Will put some images up at the weekend to check with the more knowledgeable amongst you.
Clover and Vetch are growing well and I expect to see the first blooms soon.
It is certainly exciting trying to work out what is coming up when you are not sure what is in the mix. There are few bluebells showing as well, but I will take a trip to some local woods at the weekend to get some decent images of them
On the bird front, the first baby was seen yesterday - a very tame Robin fledgling that seemed to be managing very well on its own. Blackcap and Song Thrush song is loud and frequent.
The many house sparrows are gathering up nesting material (horse hair) that has been put out for them. Unfortunately, they do not seem the slightest bit interested in the lovely homes that I have put up for them.
Blackbirds, Wood Pigeon and Collared Dove are still very active. Increasing numbers of Goldfinch are now back here and the Long Tailed Tits are still showing well.
No signs of the Swifts yet, but I expect to see them early next month back here. Plenty of House Martins and Swallows passing through, but none are staying.
Martin
Tuesday, 21 April 2009
Think ahead and get prepared 2

I did the original part to this at the start of the year,If you followed what i said then then you are getting excited as the foxes and badgers will have had their young and in a few weeks they will make their first steps into the light, The folage on the ground and in the trees will now be growing and you will see if its possible to get shots where you want or will need to make different plans and maybe bait somewhere else,Be careful what you are putting down for food as the chances are that the dog fox will take it straight back into the den for the vixen but the cubs may get hold of some so small and soft is the way to go where bait is concerned, Where there is growth on the ground you will see the animals pathways as fox and badger use the same routes for generations, Following theses path ways will tell you alot about where the animals go when exciting the dens, I would have had a hide in position by now and if you havent then get one up and covered, Its best to put up a hide and dont go near it for a week or 2 this way the fox adults will get used to it and when the young appear it will be natural for them, The vixen will be underground with the young and it will be a busy time for the Dog fox bring back food for the whole family, You will see lots of activity around the den site and its a great time to watch from a distance, It can be very tempting to get a few shots in but i would advise against any disturbance in the area until the cubs are present, Be very careful and alert when near to the dens as if a fox sees you it may move the cubs and then all the hard work and preparation will be for nothing-always remember that the animals welfare must always come before the photo
Dave
Monday, 20 April 2009
Hardware - Samsung Netbook Colour Balancing
As regular followers of the blog will know, I bought myself a Samsung NC10 Netbook a couple of months ago. This has been a great little bit of kit and have used it for presentations of slide shows among many other uses.
However, one of the problems that I have had is colour balancing the monitor. For my main monitor, I use the X Rite Eye One Display 2 and this does provide a fantastic colour balance for me. But due to screen resolutions it is not possible to use the X Rite on the Netbook. The Samsung with it's little screen res. of 1024 x 600 does not meet the 1024 x 768 res. required for the Eye One 2.
So enter stage left the Huey Pantone - a simple little device that has done the trick. It is incredibly fast and while not as sophisticated as the Eye One 2, will give a substantially improved colour balance than is possible without.
It also can be left in and will provide you with the ambient light moderator.
One to look out for if you are a netbook user
Martin
Sunday, 19 April 2009
Gear we use and abuse-Circular Poloriser

One of the most useful filters to have in your kit bag is a circular poloriser, It not only makes skies a deeper blue and saturates colours especially foliage but it also removes reflections and glare, You can see here that my filter is huge, Its a Lee filter and goes onto a filter holder but most would be the same size as the end of you lens and would screw directly onto it, I once read a review on various polorisers and they ranged from £30-£200 and at the end of the test they said that they could see very little difference in image quality although the actual build quality could be seen and that they recommended a £50 filter at the end of the test, I bought one of these high street filters and used it for about 6 years and was very pleased with it so its not always the most expensive that will serve your purpose, To get the best out of a poloriser you need to shoot at 90 degrees to the sun, So imagine the sun at one point and a line coming down to you and then imagine a line bouncing up from you at the sky making 90 degrees-that will give you the most effect,Once you have this angle sorted slowly turn the filter and you will see that sky gets lighter or darker,move it until you get the effect you want and shoot,if you turn the camera from landscape to portrait you will have to turn the filter again, In certain circumstances you can get the sky to go nearly black,this is not some thing i like to see as its very unnatural but i do see it all too often, The downside of using a poloriser is that it takes 2 stops of light away so your shutter speed will be affected and you will need to keep and eye on it so as not to get camera shake in your images, You can use a poloriser like a ND filter where waterfalls are concerned to slow the shutter speed down and get the blurry effect on water, All in all a great addition to any kit bag but only use it when necessary


Dave
p.s i would like to thank Jeff Lefevre for the use of his well manicured hands in the top photo
Saturday, 18 April 2009
News - The subject is still more important than the image
Back in January, I posted about subject welfare. Well this came to my notice earlier this week so thought I would flag it up and ask anybody to pass it in.
Dippers are an easily disturbed subject and have suffered badly at the hands of some so called 'wildlife photographers'.
Full story is posted here.
Martin
Dippers are an easily disturbed subject and have suffered badly at the hands of some so called 'wildlife photographers'.
Full story is posted here.
Martin
Friday, 17 April 2009
After the shooting is done

So you have a hard drive full of great images-what next, You have shown them on your web site and on forums and even one or two are in print on your wall, Is that it? are they now destined to spend eternity on your hard drive where nobody can see them, Well there is an answer and that is to get them in print-a book-your own personal book, Just like in the days of film where you would get a set of prints and put them in an album to show your friends every time they visited, There are lots of companies now offering this service, I recently had a couple of books made up, One for my in laws as a present showing the times that they came and visited us in France and Switzerland and a personal one again showing our time living abroad,Friends and family who stopped by,places visited and some of my favorite wildlife shots whilst we lived there, I used a company called Bob Books as a friend has used them on many occasions and was always pleased with the package and service, The procedure is simple,Download the software from their website and use the templates on the pages to drag the images onto,There are a variety of templates and you can have a full page shot down to thumnails,Put some text and go to the next page-simple, I converted my images to full size Jpegs-Srbg and dragged them onto the page expecting to either get a message saying the file was too large or get to the end and it not loading due to the huge amount of info being uploaded, I need not have worried as it all loaded within minutes and a couple of weeks later it was delivered, Now i have to say that the image quality is excellent as is the feel of the book, Its not going to fall part, Everybody who has seen it has been impressed and have said that they will be getting a book or 2 done, Although Bob Books are based in the UK the actual printing is done in Switzerland which was spooky as we had just moved from there, I know there are plenty of other companies offering the same like photobox,Mpix and even your local high street processor but i have only seen and used Bob Books and can give my recommendation to them-Top product

Dave
Thursday, 16 April 2009
From the archives - Marsh Harriers at Minsmere
Now is a great time of year to get along to RSPB Minsmere and take a visit to either the Bittern or Island Hides to get some in flight shots of the Marsh Harriers.
I have been there for the last two years and have had some great views.
Best time is first thing so you can get some space in the hides and also to catch the early light.
If you are lucky then you will also get some great views of Bittern too - either flight shots from the Bittern Hide or ground shots from the Island Hide. I usually have some bright spark tell me that they had great views ten minutes previously.


On a good spring day it is easy enough to see up to 100 species in a full day. You can also get great close up pictures of Avocet and Swallows down by the Sluice - just sit on the ground by the posts and wait for them to come to you.
Minsmere really is the birders jewel in the crown and every photographer should get there at least once in their life, and now is the best time of the year
Minsmere really is the birders jewel in the crown and every photographer should get there at least once in their life, and now is the best time of the year
Martin
Wednesday, 15 April 2009
Workflow
Firstly there is no right way of doing things, Everybody has their own way and what works for you may not work for others, I only shoot in RAW (Adobe RGB Colour space) and there are many different RAW converters like Adobes Photoshop and Lightroom, Paintshop Pro,Capture One,Canons DPP,Nikons NX2, Breezebrowser and Bibble to name but a few, I can only tell you what i use and how i use it at the moment but things are always subject to change, As i have mentioned on here before i use Breezebrowser purely to browse my images and delete the images that are not up to scratch, I also use it to rename the images and add some metadata-fast simple to use and cheap to buy,
Once i have my final selection of images in Breezebrowser i copy the RAW files into my WIP (work in progress) folder and also into their own folders say fox or waterfowl, I then open Photoshop CS4 and view the images in Bridge, after selecting an image and double clicking on it the image will open up in Camera Raw (ACR) where i will (if needed)
1,Check and Adjust Colour Temperature
2,Check and Adjust Exposure
3,Check and Adjust Recovery
4,Check and Adjust Fill Light
5,Check and Adjust Blacks
6, Add some Clarity,vibrance and Sat
Whilst in ACR i will level the image if needed, Maybe use the Grad filter if working on a landscape and may use the Adjustment brush to selectively lighten or darken parts of the image
The adjustment brush and grad tools are truly excellent and really easy to use-worth upgrading from CS2 or CS3 for,
So now we have finished in ACR we open the image into the main part of photoshop, Here i use adjustment layers and check and adjust
1,Levels (all RGB)
2,Curves
3,Saturation if needed
4,Selective Colour (Normally +2 black and neutrals)
Once these are done i go to Layer-Flatten image then check and remove any dust spots,At this point i may use some Highlight/Shadow and then Convert from a 16 bit to 8bit,The image is now finished and saved as a Tiff file-Full size, After this i then resize and save as a 1MG Tiff for agency submission and then Sharpen with USM (125/O.2/0) 3-4 times and save for the web (convert to Srgb box ticked) for web/website use. The full size Tiffs are saved in their perspective files as before and the images are then deleted from the WIP folder
This is basically my workflow at the moment, I do have Lightroom 2 and will be incorporating into the workflow soon, One thing i will say is that when processing try to be subtle in your approach,Dont over do the highlight/shadow and saturation, Try to make the image as natural as possible
Dave
Tuesday, 14 April 2009
Techniques - Macro and AI Servo
OK - so not really true macro per se, but close up.
Normally close up work for me is manual focus and manual focus only using Live View, DOF preview and 5x magnification.
But just occasionally we are set little challenges in how we capture an image.
It was under such circumstances yesterday that I found I needed to totally change my approach.
I had been watching many different butterflies in my wildlife garden and have generally always struggled to get anything half decent. They usually spot me coming from too far away and with the 100mm macro - my usual choice you need to get close.
So what to do?
Well I put together a combination of my 1Dmk3, 70-200f2.8 IS L, at 200mm Fl, with the 1.4 EFTC, plus a 20mm extension tube. This enabled me to get the minimum focus closer than the 1.4m minimum distance. I guess I could have used the 300f4 IS L as this also has a min. focus distance of 1.5m.
But why AI Servo?
My subject, a beautiful Orange Tip butterfly, showing its undersides was resting on some Shepherds Purse, of which there is plenty in the garden at the moment. However, there was quite a breeze and the thing was flapping about in the breeze. I tried to use the standard One Shot focus mode and I tried to manually focus but all the results were poor.
So I set the AI servo response to fastest in the Custom Function settings and set the AF to AI Servo mode. This way as the subject was moving back and forth the AF would continue to track.
However, it was important that I froze that movement as well so I needed to ensure a decent shutter speed, so I opted to ramp up to ISO800. This is a setting that the 1Dmk3 handles exceptionally well, provided you expose correctly.
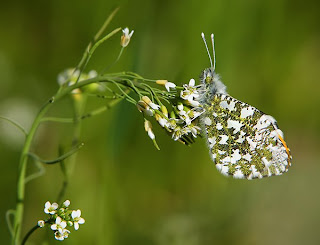
The final tip for would be butterfly photographers is to manage your depth of field. When they are resting like this, go for the side on shot, get perpendicular to the subject as the DOF you need is at its lowest. You will be surprised how much aperture you need - this was taken at f10
Martin
Monday, 13 April 2009
Lets Talk
I have always fancied doing a 'Lets Talk' general chit chat ditty so will take this opportunity to do the first one, So a week away has ended and now back at home downloading the images to be viewed on the big screen to see if the week has been a success or failure and most of all reflect on the week to know if it was fun as that's the most important thing, We often get carried away with looking through the view finder without taking time to look around, I thought this once when in India, A tiger had a kill right in front of me and i happily clicked away until i ran out of film, It was a great experience but more so when i could put the camera down and sit back and watch the events like a normal tourist taking in the whole scene not just part of it, I had no expectations last week,an open mind as it was just a recce, So in that sense the week was a success as i came away with some very nice images and made lots of mental notes for when i return i a few weeks, I knew that the deer would be without antlers and that the plant life would be a bit behind which it was, I didn't expect the place to be quite as beautiful as it was and wasn't expecting the turkeys to be so co-operative, All in all a good week.The weather could have been better,I had heavy rain,snow,sunshine and dark cloudy days so a real mixed bag but know from experience that mountain photography is that way-unpredictable,I didn't have much time to play around with my Lee filter grads but it as obvious that i will need some ND filters for the waterfall shots a i couldn't get as low a shutter speed as i would have liked,so more expense-its never ending, The Nikon D3 was used more than the D300 this time as the light was low most of the time, I don't shoot with the D300 over ISO 400 as grain starts to become apparent but i will happily shoot past ISO800 with the D3 and as long as you are careful with the metering and get your exposure spot on grain is very minimal, Another thing that came to mind when shooting was that i only had one morning where i would shot at a low ISO and that if i had an all singing all dancing Nikon D3X i would have struggled as i hear it starts to get grainy at ISO 400 and is best at 200 and below,For landscape work it would be fine but for a lot of my type of work i feel that i would struggle with it-doesn't stop me from wanting one though, So that's one week out of the way and planning the next trip in a few weeks along with future trips to the mountains later in the year,trips to the coast and a trip to Colorado-looks like the year is starting to get busy
Dave
Dave
Sunday, 12 April 2009
Views - Some days are just no good
Dave wrote a great post a couple of weeks ago titled Purple Days. Well sometimes you get the reverse of purple days - well at least I did today photographically.
As per Good Friday, or should I say crappy light Friday, the light again today was awful, and you just know that it is not worth getting the camera out of the bag.
I took a trip around some of the locations in the northern part of Warwickshire to Lea Marston trying to find some Black Necked Grebes that were reported on Birdguides. But drew a blank there - saw lots of other great sites - none of them close enough or indeed in the preferred position to photograph. Loads of Warblers - Willow, Blackcap and Reed. Plenty of Great Crested Grebes - even doing the weed dance. Great through the binocs but just not near enough.
So onto the next location, Brandon Marsh - again plenty there - Snipe, Little Ringed Plover, Ringed Plover, Greylag, Barnacle, White Front (lonesome) and Canada Geese. Plenty of wildfowl as well. A couple of Sparrow Hawk. More warblers - as before plus Sedge and Cettis. House and Sand Martins, plus Swallows.
So what with that lot, plus Kestrel, Buzzard and a couple of Sparrowhawk any birder should be pretty happy - and I was too.
But no images!!
I always tell myself philosophically that I go out to watch wildlife and if I get an image then I consider it a bouns. Sometimes I really wonder if I mean that - today was no exception
But...........but there will be better days ahead. I have checked out two great butterfly and wildflower sites, so will look forward to that as the season progresses :-)
Martin
Saturday, 11 April 2009
Trip Report-Smokey Mountains-Tennessee 3

Yesterday morning was lovely, I arrived early and went into the park,The Turkeys were at the entrance as normal,
 As they were distant i decided to come back to them later and wanted to get into a position to get some early morning landscape shots in,The mist was in a distant valley so i decided to shoot with a long lens at distance rather than make my way into the valley, A long lens will give the image compression, 'pulling' distant things together, I used the Nikon 200-400 with the D3, Shooting with a bean bag from the car, The sun was coming up to my left and just hitting the lower trees-it looked stunning with the mountains in the distance, I shot both landscape and portrait mode for the agent to choose and i shot wide (200mm) and zoomed in (400mm),
  Its amazing how some places can give you inspiration to shoot and this place does it for me, After i bagged some landscapes i went on to some deer and then back for the turkeys, A big male had made his way to the road side and whilst displaying with his back to me i managed to get into position so that when he turned around i was ready to shoot, He didn't seem to give a damn and carried on as if i wasn't there, When i left the park i decided to take some shots of the many streams with small waterfalls and bracketed my exposures so when loaded onto the PC i could HDR the image which i must admit to being very impressed with-more of that to come
Today could not have been more different, Within 30 mins of entering the park the day turned into night as the sky darkened (ISO 1600 i managed 1/8 sec) then loud claps of thunder, bolts of lightening striking the mountains around me and torrential rain, I stayed another 2 hrs but it never improved so i called it a day-Last day tomorrow so fingers crossed

Dave
Friday, 10 April 2009
Trip Report - Good Friday from Gloucestershire
 I took a day trip out around a few locations in Gloucestershire with a fellow birdwatcher/photographer and friend to see what we could find.
The first location yielded this delightful Red Crested Pochard which is now a breeding species in this location, rather than an escapee.
It was a good location with sightings of Bullfinch and a Woodlark overhead. There were also decent numbers of Sand Martin and Swallows too

On to the next location to see Grey Wagtail. This delightful male bird was running along a dry stone wall just above the river

And his 'wife' decided that should would sit over the river of this barbed wire. A marked contrast between the delicate nature of the bird against the harsh intent of the barbed wire
 Then on to WWT Slimbridge to take a look at the kingfishers. We saw them briefly but all at too great a distance to get decent images. So around to the South Lake hide, which is probably the best in terms of point of view. A couple of Little Grebes entertained us for a while
A short while later this beautiful Great Crested Grebe and partner came across, this one catching a small fish which was interesting to watch
Sadly, it was horrible grey flat light all day, so the images are not good from a light perspective but thought I would share with you as a record of some of the day.
Martin
Thursday, 9 April 2009
Trip Report-Smokey Mountains-Tennesse 2

I didn't make it into the Smokies yesterday-The weather was very bad with heavy Snow showers and i had a couple od things to sort out, I had looked at the forecast for today and it looked pretty good so i was itching to get out this morning and arrived well before the gates opened,There was still snow on the mountains and a report of 12'' at the top-all in one day,The morning was bright and frosty with a thin layer of snow at the base of the mountains, As per their name the floor had a nice thick layer of mist that quickly burnt off,but not before i shot some landscapes and a couple of deer,
 The Turkeys were still near the entrance but still distant so i hoped that i would bump into some more further round the park, Little did i know that it would be near te end of the loop that some Turkeys popped out of the woodland but were followed (too) closely by a local photographer who literally herded them along-no point in staying there so i drove off but as i did another single turkey appeared and strutted his stuff right in front of me, I took some full body type shots before grabbing the big gun (600) which had a 1.4x and D300 attached, I had seen an image a long time ago that really impressed me of these strange looking bird, I looked through the view finder and it was full of turkey, the shutter speed was very low 1/40 but i didnt want to up the ISO so a steady hand was called for and i managed plenty of shots to make sure that i had nailed it-brilliant only 2 days in and my target was in the bag, I drove off very pleased with myself and quickly viewed a large woodpecker through the trees-a pilated-it was massive (size of a crow) and only a few feet from the floor, I tried from the car but there was too many branches in the way, I slowly got out of the car and quietly crept through the woodland only for a truck to pull up to see what i was doing and the bird flew, I carried on driving to the camp site to see if any bears had been seen, i grabbed a coffee and waited, A few American robins landed nearby so i grabbed my camera and a young lad came from nowhere and chased them off-looking very pleased with himself-dont you just love em, Once the kid had gone i carried on waiting to see if they returned, they didnt but instead another pilated woodpecker landed in the tree right in front of me, I only had the camera and beanbag so had to handhold the monster lens,after a had some shots in the bag i decided to quickly go to the car and grab the tripod,The bird hung around and as i grabbed another couple of shots it dropped out of the tree and fed around a stump close by-well all my christmas's came at once and it stayed for about 10 mins and in the shade so i didnt have to worry about blowing the bright whites, The Pilated is a bird that was high on my wanted list when i came to the states and to have one so obliging was amazing-what a morning and what a place, I cant wait for the 'fall' as this place is soo picturesque during the winter it will be amazing with the golden folage
Dave
Wednesday, 8 April 2009
Gear we use and Abuse - Graduated Filters
Although Dave and I are primarily wildlife photographers, we both do a bit of landscape photography too. There is a natural fit really with the places that we go and see.
Now the best landscape photography is all about light and how we use it to the best of our ability. The same scene can have many different looks as a result of the different light from the different times of the day and at different times of the year with the sun is at a different height.
One of the tools that we can use to help us control that light is the Neutral density graduated filter, or ND grad as they are known for short.
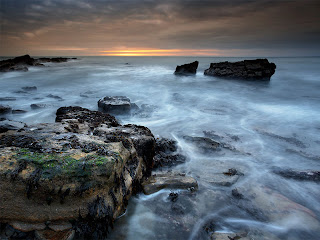
The image above used a 2 stop hard edged ND grad to hold back the brighter sky and allow me to get detail in the much darker foreground.
Both Dave and I use the Lee Filters system. It is quite expensive as filter systems go, but as the old mantra goes 'You get what you pay for'.
Today I will cover just the resin filters that I use. Later blogposts will cover how we attach to the camera and also the use of polarising filters.
Lee sell ND grads in sets of three ranging from 1 stop to 3 stops, which they sell 0.3, 0.6 and 0.9. The number of stops indicate the amount of light that they 'hold back'.

This image shows the full set of the hard edge grads. the term hard edge refers to the transition from the filter through to the clear. Hard meaning the transition is short and soft where it is more gradual as you will see below.

On this image you can see the difference in the transition between hard and soft.
I would tend to use the hard edge when I shooting seascapes like the image above and then use the soft edge when I might have some parts of the image in the filtered part where I want less filtration. You have to be very careful, particularly with mountain landscapes that you don't end up with heavily darkened parts of the scene as well as the sky.
This is one area where I use a special filter that I had made to order which is the blending filter (last filter on the right in the image).
This filter goes from 3 stops at the top and blends evenly to zero at the bottom with no harsh edge stops. This is one of my favourite and most often used filters to give methat gradual transition and avoid the obvious steps.
One useful tip I learned was to use the DOF preview button to better see the effects of the filter. More modern cameras have live view and with a combination of that, the histogram displayed and the DOF button depressed, you really can see every bit of information you need and mistakes or wasted shots really shouldn't occur - but we will still make those mistakes - I know I do.
So look out for future posts on the rest of the system and polarisers
Martin
Now the best landscape photography is all about light and how we use it to the best of our ability. The same scene can have many different looks as a result of the different light from the different times of the day and at different times of the year with the sun is at a different height.

One of the tools that we can use to help us control that light is the Neutral density graduated filter, or ND grad as they are known for short.
The image above used a 2 stop hard edged ND grad to hold back the brighter sky and allow me to get detail in the much darker foreground.
Both Dave and I use the Lee Filters system. It is quite expensive as filter systems go, but as the old mantra goes 'You get what you pay for'.
Today I will cover just the resin filters that I use. Later blogposts will cover how we attach to the camera and also the use of polarising filters.
Lee sell ND grads in sets of three ranging from 1 stop to 3 stops, which they sell 0.3, 0.6 and 0.9. The number of stops indicate the amount of light that they 'hold back'.

This image shows the full set of the hard edge grads. the term hard edge refers to the transition from the filter through to the clear. Hard meaning the transition is short and soft where it is more gradual as you will see below.

On this image you can see the difference in the transition between hard and soft.
I would tend to use the hard edge when I shooting seascapes like the image above and then use the soft edge when I might have some parts of the image in the filtered part where I want less filtration. You have to be very careful, particularly with mountain landscapes that you don't end up with heavily darkened parts of the scene as well as the sky.
This is one area where I use a special filter that I had made to order which is the blending filter (last filter on the right in the image).
This filter goes from 3 stops at the top and blends evenly to zero at the bottom with no harsh edge stops. This is one of my favourite and most often used filters to give methat gradual transition and avoid the obvious steps.
One useful tip I learned was to use the DOF preview button to better see the effects of the filter. More modern cameras have live view and with a combination of that, the histogram displayed and the DOF button depressed, you really can see every bit of information you need and mistakes or wasted shots really shouldn't occur - but we will still make those mistakes - I know I do.
So look out for future posts on the rest of the system and polarisers
Martin
Tuesday, 7 April 2009
Trip Report-Smokey Mountains-Tennesse

Yesterday i drove from North Carolina over the Great Smokey Mountains to the Tennesse side, I arrived about 2pm and dropped my cases off at the motel,I grabbed my gear and headed towards Cades Cove, I have never been before but had done my homework, Cades Cove is in the Smokies National Park and is a very historic part of the park with ancient buildings dotted around,
 Its very well known and extremley busy, If cades cove was a NP it would be the busiest in the States-very popular to say the least, The animals and White Tailed Deer in particular are very easy to approach and if you see an image of a WT Deer published chances are it was taken here, I knew i was out of season, the deer have rutted and lost their antlers,For deer shots its best in the 'Fall' and i have a cabin booked especially for that-Then it will be crazy with people, One thing that suprised me is that if you park up you are free to walk off trail and approach the animals, I drove around the 11 mile loop road and viewed lots of deer along with some wild turkey, Then about half way around i saw a black blob near some woodland, I grabbed the bins and it was a bear so i grabbed the gear and headed down towards it,when i got closer i looked behind me and i had about 100 people running down towards me mainly young kids shouting and screaming, The parents egging them on to get closer,
 Luckily there was a ranger at hand and he did his best to keep the crowd back especially when we realised that there was a young bear with it, I only had the D3 and 600, In my panic i forgot the extenders,It was good to see but because of the crowds the bears kept distant but a good start, Today i was at the entrance at dawn and waited with a couple of other photographers for the gates to open, Instantly there were Wild Turkey going through the courting process and what magnificent creatures they are when strutting their stuff,They were way too distant but i did managed to get close to one later on although he though he was a capercaille and stayed in the woodland, I also bumped into a group of deer and decided to get some shots and 2 of the deer decided to have a fight and stood on their back legs and bitch slapped each other like march hares, The weather today was very cold and late this evening it started snowing-snow is predicted for the next day or 2 and freezing temperatures,not what i expected and it will put paid to any landscapes with sky and to any wildflower photography,One thing that is here in abundance are waterfalls so i have already been having a play in the low light,The D3 and 24-70 are a match made in heaven for this and as well as full waterfall landscapes i have been doing some details stuff at different shutter speeds to get different effects, With the unpredictable weather we will have to see what happens to the wildlife but if i can i will concentrate on the turkeys whilst they are courting, I was lucky today when i found a group of deer and the main male still had a 'rack' but i bet he is the only one
Dave
Monday, 6 April 2009
Views - Where to find your subjects
I was browsing around the web and blogosphere late last week and read an article that got me thinking.
It was a request for the locations of a number of different species of wildlife for photography.
Now maybe I am being a little sniffy here but it did rather smack of laziness.
My philosophy starts with researching my subject first, finding out its seasons, habitat and then locations. There really is so much resource available on the web and in print that it really is unforgivable not to just carry out some basic legwork yourself.
Sites like The Gloster Birder in local terms for me and Birdguides across the rest of the country will tell you what is about. I subscribe to Birdguides and have email alerts, so when I go away I can either ping it to my netbook or Blackberry.
But there are dozens of great books available, some of which I have linked below. The 'Where to watch Birds in' series covers all counties of the UK and also pretty much the rest of the world.
The BBC 'Natures Calendar' also gives a seasonal glance around the sites of the UK.
Mike Lane has published a great little book called 'Where to Photograph wildlife in Britain' - a number of sites in here I have visited having bought the book.
Amazon is a great source and usually about the best value for most of these.
Then of course, there is our great friend Google, just type in what you are looking for and you will almost certainly find it.
Martin
Sunday, 5 April 2009
Processing-Colour Casts
Images may have a colour cast for many reasons but by careful processing there is no reason for them to be there,Its not always easy to see a colour cast until somebody mentions that its a tad green or blue, After doing your minor adjustments in ACR open the image in Photoshop,Go to Levels and you will see the Channel:RGB which has a drop down bar,Click in the drop down bar and you will see it says RGB,Red,Green,Blue, I start at the bottom by clicking on the blue,Check to see if the sliders need to move 'in' to the histogram the same as you would normally in levels,Hold the ALT key down whilst you move the left or right slider in,The screen will go a solid colour,Keep your finger on the alt all the time until you see some speckles coming into the image-back the slider off until the speckles disappear and continue doing the red and green channels in the same way,Once you have done the red,green and blue go back to the RGB channel and see if that needs adjusting and once done you should not have any colour casts-easy
Dave
Dave
Saturday, 4 April 2009
Local Patch - Quick Garden Update
The sun is shining brightly again and the butterflies are coming in frequently now. With a few Small Whites now showing, and the first Peacock today as well. Brimstones and Commas still showing well too.
Bird activity is less now as they are in full nesting mode. Wood Pigeons, House Sparrows and Blackbirds are still eating us out of house and home. The male Blackcap has been showing well from time to time. Fabulous views this morning of the male Sparrowhawk who flew directly at me as I was watching out of the first floor window, then banked round just about 8 feet away - stunning sight. The Sparrows don't appear to be taking any notice of the two boxes that I have put up for them, but I will keep my eyes open.
All seven large blobs of frog spawn in the pond have now disappeared and the place is teaming with lively little tadpoles.
I haven't noticed any new wildlfowers out yet since my last update, but the bluebell leaves are coming up as are the Arum Lillies, so I hope to see something from those in the next few weeks. There were supposed to be some Wood Anemones in that particular area in the mix I put down but these haven't showed. The local woods are teaming with them at the moments so maybe they need another year before they will show.
Martin
Friday, 3 April 2009
Techniques-on board Flash for wildlife continued
 Following on from Martins post yesterday I thought I would show my way of using flash with wildlife photography, Martin prefers the Manual exposure method whereas I like the AV method, When using flash in Manual the flash becomes the main light source whereas in AV or TV its just 'fill' lighting so where Martin needs to balance the flash with the ambient light to stop having a black background i simply need to compensate on the flash to stop over lighting the subject,When i used film/slide cameras in the past I found that by dialing in -1.7ev it gave perfect fill lighting,just enough to remove shadows and give a glint in the subjects eye,Today's sensors are more sensitive than film and i find that -2 1/3 is about right,obviously subject distance plays a part but at normal shooting distance like 6 metres with a 600mm lens this setting is good, At normal distances like this its not necessary to use a better beamer but i like to as it concentrates the light onto the subject,
 Its a powerful tool and you will need to practice with it and keep an eye on the histogram, Flash is good but too much flash where it is obvious can also ruin an image,
I am off to the Great Smokie Mountains next week and hope to get some wildlife,macro and landscape shooting in, I am leaving Sunday so will be spending the day travelling but will leave a few words on correcting colour casts for Martin to post
Dave
Thursday, 2 April 2009
Techniques - On board Flash for wildlife

Following on from a thread over at Canon Fodder forums , I thought I would put down a few musings of the whys and wherefores of using flash when shooting wildlife.
Firstly, you need to understand why you want to use it and then secondly will it suit the subject matter, and then finally and in my book most importantly will it cause your subject any distress.
Remember welfare of the subject comes first.
But lets assume you have ticked all those boxes to your satisfaction or at least the second two, but why?
Well there are some times that the ambient light is too strong or nor sufficient.
 Too strong? - We have all seen wedding photographers using flash in bright sunlight to put some light into harsh shadows. Same with wildlife. It can work.
But we may have situations with very flat light or insufficient light and we might want to just pop a little bit of fill light in just to balance the image.
Now this Moorhen isn't a particularly brilliant image, but it was shot with the 500 + 1.4, so 700mm @ f 5.6, 1/125 sec and ISO1600, and M Mode. Flash was set to M mode with the flash extender. Now the EOS flash system does a pretty good job of flash metering, and am sure the Nikon system is at least as good.
 So this is a ambient balanced exposure. What the flash has done has put a decent amount of detail and colour into the bird in really dark conditions.
You will see one flaw that you need to be aware with this type of shot. There is a very slight shadow cast behind the bird as a result of the flash being raised above the centre line of the lens. It is slight but there so one thing to remember when using it for this type of image.
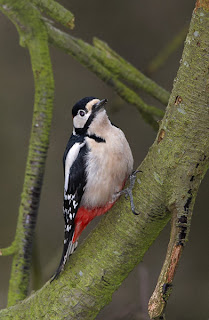
It works a little better with the Great Spotted Woodpecker, as the shadow cast has nothing to land on. But again very careful observation will show some unnatural catch lighting in the eye with reflection from the back of the retina. It is not too bad, but don't try with Owls - with their massive eyes you really will have a very ghostly apparition.
It has worked pretty well with the Robin below, particularly where you have a bright highlight sky behind. With careful dialling in of the power settings you can let the flash manage the exposure on the subject, and meter to underexpose for the background in the camera settings. So in this case, I underexposed the background by about 1 stop and set the flash exposure to give a zero compensation. Both camera and flash in M mode again.
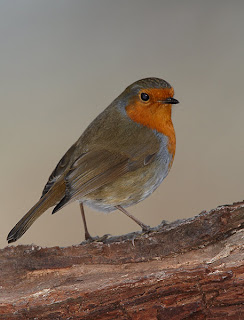 Again, you can see the eye reflection has it's problems, but the exposure is reasonably well balanced and certainly enables the colours to show well on a dreadful light day.
All shots were taken at ISO1600, and I have not used any noise reduction either in camera or post processing. However, if I wanted to print these I would run some NR on the backgrounds.
I used the Canon 580 EX flashhead with the Kirk Extender, which is essentially the same as shown on the opening picture of Dave's set up with the Better Beamer. They are recommended for lenses above 300mm and are said to be worth about 2 to 3 stops worth of additional distance. They basically comprise of couple of bits of plastic, designed for your particluar flashhead, with a stick on Fresnel lens on the front to concentrate the throw of the light. On the Canon, it is recommended to manually set the zoom setting on the head to 50mm, which is I guess the optimised distance for the light to lens gap.
But we will make that the subject of another blogpost at a later date.
Now this Moorhen isn't a particularly brilliant image, but it was shot with the 500 + 1.4, so 700mm @ f 5.6, 1/125 sec and ISO1600, and M Mode. Flash was set to M mode with the flash extender. Now the EOS flash system does a pretty good job of flash metering, and am sure the Nikon system is at least as good.
 So this is a ambient balanced exposure. What the flash has done has put a decent amount of detail and colour into the bird in really dark conditions.
You will see one flaw that you need to be aware with this type of shot. There is a very slight shadow cast behind the bird as a result of the flash being raised above the centre line of the lens. It is slight but there so one thing to remember when using it for this type of image.
It works a little better with the Great Spotted Woodpecker, as the shadow cast has nothing to land on. But again very careful observation will show some unnatural catch lighting in the eye with reflection from the back of the retina. It is not too bad, but don't try with Owls - with their massive eyes you really will have a very ghostly apparition.
It has worked pretty well with the Robin below, particularly where you have a bright highlight sky behind. With careful dialling in of the power settings you can let the flash manage the exposure on the subject, and meter to underexpose for the background in the camera settings. So in this case, I underexposed the background by about 1 stop and set the flash exposure to give a zero compensation. Both camera and flash in M mode again.
 Again, you can see the eye reflection has it's problems, but the exposure is reasonably well balanced and certainly enables the colours to show well on a dreadful light day.
All shots were taken at ISO1600, and I have not used any noise reduction either in camera or post processing. However, if I wanted to print these I would run some NR on the backgrounds.
I used the Canon 580 EX flashhead with the Kirk Extender, which is essentially the same as shown on the opening picture of Dave's set up with the Better Beamer. They are recommended for lenses above 300mm and are said to be worth about 2 to 3 stops worth of additional distance. They basically comprise of couple of bits of plastic, designed for your particluar flashhead, with a stick on Fresnel lens on the front to concentrate the throw of the light. On the Canon, it is recommended to manually set the zoom setting on the head to 50mm, which is I guess the optimised distance for the light to lens gap.
But we will make that the subject of another blogpost at a later date.
Now my technical skills with the flash can always be improved so if there any pearls of wisdom that I have missed then please let us know.
Martin
Subscribe to:
Posts (Atom)