Showing posts with label Techniques. Show all posts

Tuesday, 16 June 2009

Tips & Techniques - Lighting Control

A couple of nights ago I went to the Orchid site to get some more images. One of the things I wanted to do was to share the results of using full sunlight, with and without fill flash and diffused light, with and without flash.

For consistency I set the camera up on a tripod, with the 1Dmk111, used the Canon 100f2.8 macro in Av mode at f9.0, and the metering set in Evaluative mode. All images were set to -1/3 EV comp and the subject distance was 0.69m.

I have just straight processed the RAW file - no tweaks, and just resized to 600pixels, and one light stage of sharpening just for the web and the colour space converted to srgb. Camera was set to AWB and unchanged in the RAW conversion.

For the flash shots, I used the Canon MR14 ring flash, set to ETTL mode. For the diffuser I used a large circular Lastolite diffuser that was hand held over the subject.

Click on the image to enlarge to see in better detail, and then hit the back button to get back as the images don't open in a separate window unfortunately

Full sunlight - no flash


Full sunlight with fill flash set to minus 1 EV


Hand held Diffuser - no flash


Hand held Diffuser - fill flash set to zero EV compensation


Hand held Diffuser - fill flash set to minus 1 EV

It would be good to get your feedback and comments as to what you think provides the most pleasing and natural image, and why you think that.

So over to you.

Martin

Thursday, 19 March 2009

Tips and Techniques - Sharpening

Well having read lots of questions about sharpening, and seen lots of problems with digital sharpening on prints, web images and digitally projected images I thought it was about time I did a 'Techniques and Tips' tutorial.

Before I start I need to issue a health check - there are many many ways to sharpen digital images - I know I have used many different ways to get to where I am now.

This is my way - it works for me. If your way works - great, stick with it but if it doesn't then here is an option for you to consider.

Before we start, lets just consider workflow.

I review my image with Breezebrowser Pro, check out link for Dave's review last month, using the view in HQ mode to see if the image is a keeper or bin fodder.

Once I have decided what I want to keep I convert the .cr2 file to a 16bit TIF - always. Not jpeg, not 8 bit.

I then post process, currently using Adobe Photoshop CS3. The image is generally still at original size unless I am doing a quick and dirty for a web post or something.

So global changes in the RAW processing, local changes using adjustment layer masks for levels, curves, sat, and selective colour.

Then I save the file as my master.

Now the next choice is what form of output do I go for. Once I have decided I will then crop or resize the image. I may, albeit rarely, run a bit of localised noise reduction using a layer mask in a separate layer and then only attack the noise areas, certainly not the main subject such as a bird, to avoid loss of detail.

Now I think about sharpening.

So I will show some quick screen grabs to illustrate.
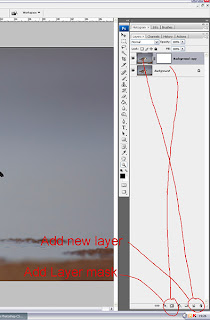
Take your master, save as a separate file and flatten any layers that you have to help make the file size more manageable.

In the layers pallette, drag and drop the background layer onto the 'Create a new layer' icon at the bottom left. This will give you a duplicate layer. On that bottom row of icons, you will also see a 'Add Layer mask'.

Click that and you will see a small white rectangle next to the duplicate layer.
Click back on the duplicate layer thumbnail, next to the new layer mask. This will ensure that the sharpening changes you make are being applied to the image and not the mask.

Then select Filter >Sharpen > Unsharp mask.

Set the zoom at 100% if you are sharpening for web/digital projection and 50% if printing. For the former, I would use about 50%, 0.3 and 0. I then do this a few times until it is just oversharpened in the window. Then click OK.
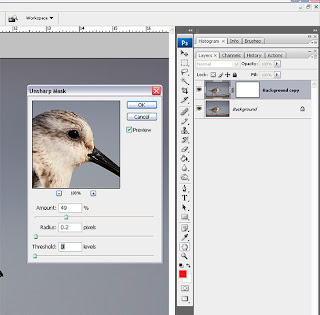
Now on the full screen image at actual pixels, so Zoom, then actual pixels to get that, I then modulate the opacity of the layer using the percentage slider to fine tune the sharpening to exactly where I want it. If there are slight halos, I look to slide back until they have gone.

However, if they don't totally go, then don't fret - more later.

The next thing is I then click on the layer mask we added a bit ago, then select the paint bucket tool and fill the layer mask with black paint and all the sharpening disappears. Huh? I hear you say.

Stay with me.

Then click the \ key, select the paint brush tool, set the colour to white and start painting those areas of the subject you want sharp, and only those areas. The area you are painting will show as red so you can see where you have been. Just toggle the \ key on and off as you require to see the effects.
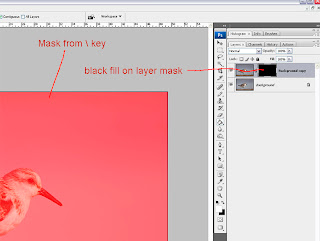
Complete the image and check. Use the opacity slider just to re verify you are happy with the level of sharpening.

If you have any halos, you can actually paint then out again, by selecting the brush, colour black, set the brush to a small and hard setting and paint the halos into history.

Make sure you paint sharpening onto any areas of the scene that you think needs to be sharp.

Now I have shown a Sanderling here. I only want the bird and the sand that is in the line of the DOF in focus. If I sharpen the background, I might induce noise or sharpening artefact's, so this method will allow me to keep that creamy smooth. Particularly important when I am making A3 + prints.
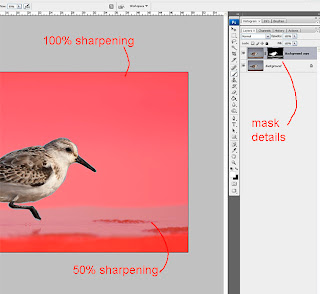
Also remember you can vary the levels of sharpening that you give an image across it by varying the levels of masking. If you have set the sharpening for one area at the optimum level, but you want a some but not as much in another area, then set the opacity of the brush tool to 50% or whatever is appropriate for your image and paint the sharpening out.

This might sound complicated, but once you have done it once or twice, it comes very quickly.

Now as I say, this works for me and if you have your own pet method, then do stay with it. But I have found I can avoid inducing or increasing noise, I can control the halos, only that part of an image that I want is sharpened.

if you try this, lets us know how you get on.

Scott Kelby shows a number of different ways to sharpen in his books that you might also like to look at.

Update: Replaced the last two images as the original ones showed you how to nicely sharpen the background and not the subject - apologies for the confusion

Martin


Monday, 2 February 2009

Techniques-Metering my way


Firstly there is no right way of metering a scene, As long as you get the right exposure in your image whether using Manual, Evaluative/matrix, Spot, Centre weighted or whatever its the final image that matters, I know that Martin is a fan of manual metering where he sets both shutter speed and aperture as he mentioned in his post, Well i am a fan of using AV and matrix metering where i set the aperture and control the depth of field but i allow the camera to set the shutter speed although i control this by using exposure compensation if needed, When i used the Canon 1D MK3 i used to start by flicking on the live view feature and view the live histogram,check this and adjust as needed, This way i knew that when i took a shot the exposure would be spot on, A great feature and one i really miss on the Nikon,These days Camera metering is extremely accurate and using both the Canon and Nikon systems i can say that the Nikon system is between 1/3 and 2/3 of a stop better in keeping whites from blowing, I noticed this when shooting side by side with another Canon photographer who was compensating more than me to stop his whites from blowing, This all helps when processing meaning that you need to adjust less to bring the whites or shadows up, I do in certain circumstances use manual mode,These would normally be in heavy snow where i set the camera to manual and spot metering, After i have set the aperture that i want i will then take a reading off of the snow and add 2 stops, This keeps the whites nice and white, I always do a test shot after setting up and then compensate as necessary, I also use manual when shooting at night for badgers, Here i am using flashguns to emualte daylight and know that the light will be constant which is the important thing when using this mode, I have in the past used manual mode in constant light for birds in flight but this is more of a whim for me as i get just as good results using AV, When i set up for manual like Martin i tend to look for a mid toned object (doesn't have to be grey-Could be mid Red,Blue,Green) and meter off of that but if you understand tones you can meter off of parts of the sky and add +2/3,Off of a white subject like a cloud and add between 1.5 and 2 stops or even off of a black subject and take away 2 stops, Its all down to the tone, The histogram that you get with a digital camera is your best friend along with the flashing highlights you should always have a correct or near as damn it exposure, I am a fan of exposing to the right and started to slightly over expose my images before i had ever read about it, It started when shooting Chamois in snow, By slightly over exposing but making sure i didnt blow the whites i noticed that i had better detail in the dark fur, You need to learn to read a histogram and understand what the tones are that are in it, By exposing to the right you are making sure that the maximum amount of tones are present in the image and can then adjust the exposure in processing, Adjusting slight over exposure doesnt cause grain to appear in the final image but bringing up a dark exposure does,This becomes more important when using high ISO where grain can start to show, Careful exposure means that there will be less processing and as such less grain, Once you have used your choice of metering for a while things will start to come naturally and when you look at your subject say a swan you will know of using AV/Evaluative metering that you will need to compensate by say -1/3 or -2/3 to stop the whites blowing-practice,practice and then practice some more and keep an eye on your best friend-the histogram


Dave

Monday, 26 January 2009

Techniques - Metering

One of the comments we had early on was for some technique tips on metering, or more correctly shooting mode.

For most of my work these days, I tend to use M Mode. All the images on the Short Eared Owl post were taken in M mode, and I will tell you how I did it a little further on. When I started off my wildlife photography, it was either Av or Tv mode, depending on the speed of the subject. Control of the depth of field is probably the most overarching variable to control. We often prefer to just isolate our subject, blur out the background so all concentration is on the subject and we are not distracted by busy and cluttered backgrounds. However, this is something that we should be looking closely at when taking the image. Often with Birds in flight, I wait before I press the shutter button so the subject is in the right part of the scene, rather than just snap away.

However, there are other times, such as with the Armilleria fungus in this post, I actually wanted to get a good sense of the environment of the forest to put the subject in place.

Anyway, before I get too distracted by depth of field, lets concentrate on shooting mode With Av mode, we control the aperture, setting the depth field at whatever subject distance and focal length we are using. The camera then sets the required shutter speeds, based on whatever ISO and metering pattern you have selected. We will cover the metering mode (spot, matrix, partial etc) and the different options at a later date, as this is worthy of a separate posting.

Now Av is fine as long as your subject is in a reasonably consistent background. So what if your subject, lets say a Red Kite is one minute against a bright sky and the next against the dark tones of trees . If you are in one of the auto or semi auto modes, your exposure is going to be all over the place. Yet, the light may not have changed on the subject, and that is what we want the exposure for. In Av mode, we might have been at + 1 1/2 stops to counter the bright sky, which is going to be clearly very wrong for when the subject dips below the tree line.

To counter this, I shoot in M mode - but how do I set the three variables f ISO, aperture and shutter speed. Simple - meter from a suitable mid tone, grass is a good place to start. For the Owls, I metered from the foreground grass, took a shot, checked the histogram and that was that. Using the ISO to ensure that the shutter speeds was in the right sort of range, the aperture set for the depth of field I wanted, and the shutter speed fast enough to make sure I had a fighting chance of a sharp image.

Once the exposure set, then I can forget it and just get shooting, and wherever the bird goes, it will be correctly exposed won't it? Well not quite - you do have to keep an eye on the light levels. So when the sun is popping in and out of the clouds, you do need to adjust the exposure to ensure a consistent exposure. But you will be surprised how sensitive you get to the changes in light, and it will become instinctive you to dial in the extra light you need.

So there you go, if you haven't tried it, give it a go, let us know how you get on

Martin